
Five fabrication families govern nearly all radius millwork: solid machining (nested band-sawing), block-lamination, ply-lamination, core-veneering, and kerfing. The governing rule is simple: ply-lamination and core-veneering suit tight radii and continuous grain, solid machining and block-lamination suit gentler curves and longer runs, and kerfing serves field bends where the specification permits it. Preservation projects add a further demand: matching material, full-scale templates, and approved mock-ups before anything leaves the shop.
TL;DR:
- Ply-lamination and core-veneering are best suited for tight radii on curved profiles, while solid machining and block-lamination work better on gentler curves and longer runs.
- Full-scale templates and mock-ups are essential for preservation projects and when matching original grain and material in historic replication.
- Material species, ply thickness, and moisture conditioning directly impact achievable radius, with thinner plies and proper prep enabling tighter bends.
- Shop schedules depend heavily on form production, custom knife grinding, and adhesive curing times, which influence costs and delivery timelines.
- Concealing glue lines requires careful sanding, color-matched fillers, and proper staining, with verification protocols to ensure consistent appearance and quality.
Table of Contents
- Fabrication methods explained: strengths, limits, and visual outcomes
- How to choose a method: decision criteria and quick rules of thumb
- Materials and grain: species selection, ply thickness, and moisture prep
- Templates, shop drawings, and field measurement best practices
- Tooling, forms, and shop workflow for producing radius work
- Finishing and quality control: concealing glue lines and verifying appearance
- Historic preservation considerations: matching originals and review approval
- Gepetto’s checklist for specifying radius millwork in contract documents
- Gepetto services: custom radius millwork and historic replication
- Sources
- FAQ
Fabrication methods explained: strengths, limits, and visual outcomes
Solid machining, or nested band-sawing, cuts the curve directly from solid stock, following the arc’s layout on a bandsaw before final shaping. It gives continuous grain and a clean, traditional appearance, but stock width limits the length of any single piece without a joint, which matters on wide elliptical heads or long sweeping casings.
Block-lamination glues smaller blocks together before bandsawing the curve from the built-up mass. It extends beyond what a single board can offer and suits moderate curves where some glue-line visibility on the face is acceptable.
Ply-lamination bends thin plies around a form, letting the curve take shape without external bracing once cured. The AWS standard notes that this method keeps glue lines running with the edge grain and the curve itself, which makes them far less conspicuous than a kerfed or segmented joint.
Core-veneering wraps a veneer face over a shaped substrate, giving the fabricator close control over figure and color on visible surfaces while the substrate handles structure.
Kerfing saws a series of closely spaced cuts into the back face of a board, allowing it to flex into a curve on site. It is fast and economical for gentle, non-structural bends, but it tends to leave flats on the face in tighter radii, a tradeoff worth weighing before specifying it for decorative work.
How to choose a method: decision criteria and quick rules of thumb
Method selection comes down to a handful of axes: how tight the radius is, whether the profile face is simple or deeply molded, how much grain continuity the design demands, how long the run is, whether the piece carries structural load, and what the budget and schedule allow.
- Tight radius with visible grain flow: specify ply-lamination or core-veneering.
- Gentle curve, long run, cost-sensitive: solid machining or block-lamination.
- Non-structural field bend where flats on the back face are acceptable: kerfing.
- Deeply molded decorative profile on a tight arc: ply-lamination with custom knife work.
- Historic replication where original material and grain pattern must match: solid machining or segmented lamination, confirmed by mock-up.
Specifications should mandate a method outright when grain continuity or historic accuracy is non-negotiable. Where appearance tolerance is looser, “manufacturer’s option with approved mock-up” gives the shop latitude without risking an unacceptable result on a finished building.
Materials and grain: species selection, ply thickness, and moisture prep
Species choice balances workability against figure. Mahogany, white oak, and sapele machine and bend predictably and take stain evenly, while figured woods like curly maple offer striking grain but complicate bending and glue-line concealment.
Grain orientation controls how continuous the curve reads to the eye. Selecting veneer faces with matching grain direction, and sequencing them around the form in order, keeps the arc looking like one continuous sweep rather than a patchwork.
Ply thickness and species set the practical radius limit for lamination work: thinner plies bend tighter but require more laminations and longer clamp cycles to build the same finished thickness. Moisture conditioning before bending reduces springback once the piece leaves the form and lowers the risk of delamination at the glue line, a failure that shows up months later as a visible crack rather than at the bench.
Templates, shop drawings, and field measurement best practices
Full-scale templates and scribed arcs remain standard practice for radius elements because a drawing at reduced scale cannot reliably capture a curve’s true geometry. Shops typically transfer the template directly to the layout stock, eliminating the compounding error that comes from scaling up a small drawing.
- Produce a full-scale template or scribed arc from field measurements before cutting any stock.
- Draft shop drawings showing profile, sightlines, tolerances, blocking, and installation notes consistent with AWI submittal requirements, which call for drawings per AWI 100 submittal practices and field verification where applicable.
- Verify field dimensions against the original opening or existing fabric before committing to final production.
- Build and submit a mock-up for review and sign-off before full production begins.
On preservation projects, this sequence also satisfies the documentation that review agencies expect to see before approving replacement work.
Tooling, forms, and shop workflow for producing radius work
A radius shop runs on a defined set of equipment: bandsaws for rough curves, vacuum or clamp-up forms for lamination, routers and trammel jigs for profiling, and custom-ground molding knives for matching historic sections. The Popular Woodworking guide to routing arches describes trammel jigs and progressive shallow routing passes as the standard approach to shaping curved panels without tear-out, a technique that scales directly to arched casings and moldings.
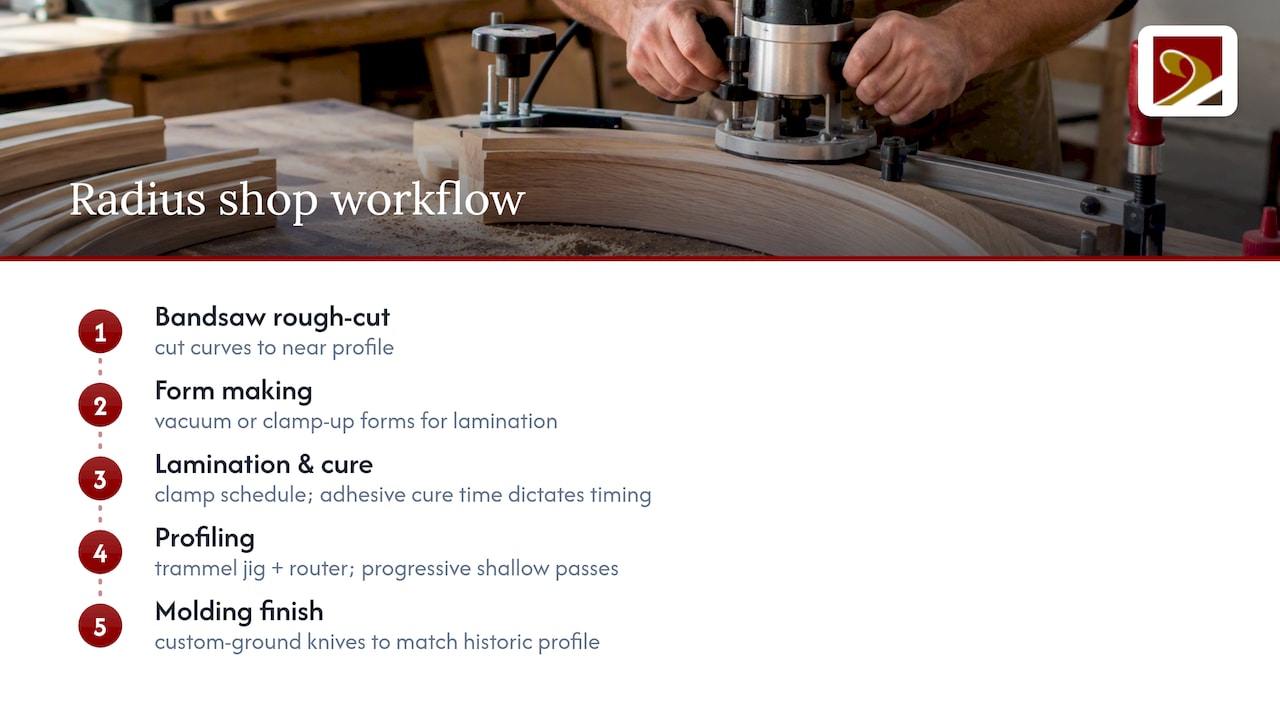
Form production and clamp schedules drive much of the timeline on laminated work, since adhesive cure times cannot be compressed without risking a weak glue line. Custom knife grinding, often needed to replicate a historic profile exactly, adds its own lead time before a single foot of molding runs. These production realities, more than the cost of raw material, typically set the schedule and the price on a radius order.
Finishing and quality control: concealing glue lines and verifying appearance
Sanding progression matters more on curved work than on flat stock, since tool marks and glue-line ridges catch light differently along an arc. A graduated sequence, moving through successively finer grits, removes machine marks and blends laminated joints before any filler or stain goes on.
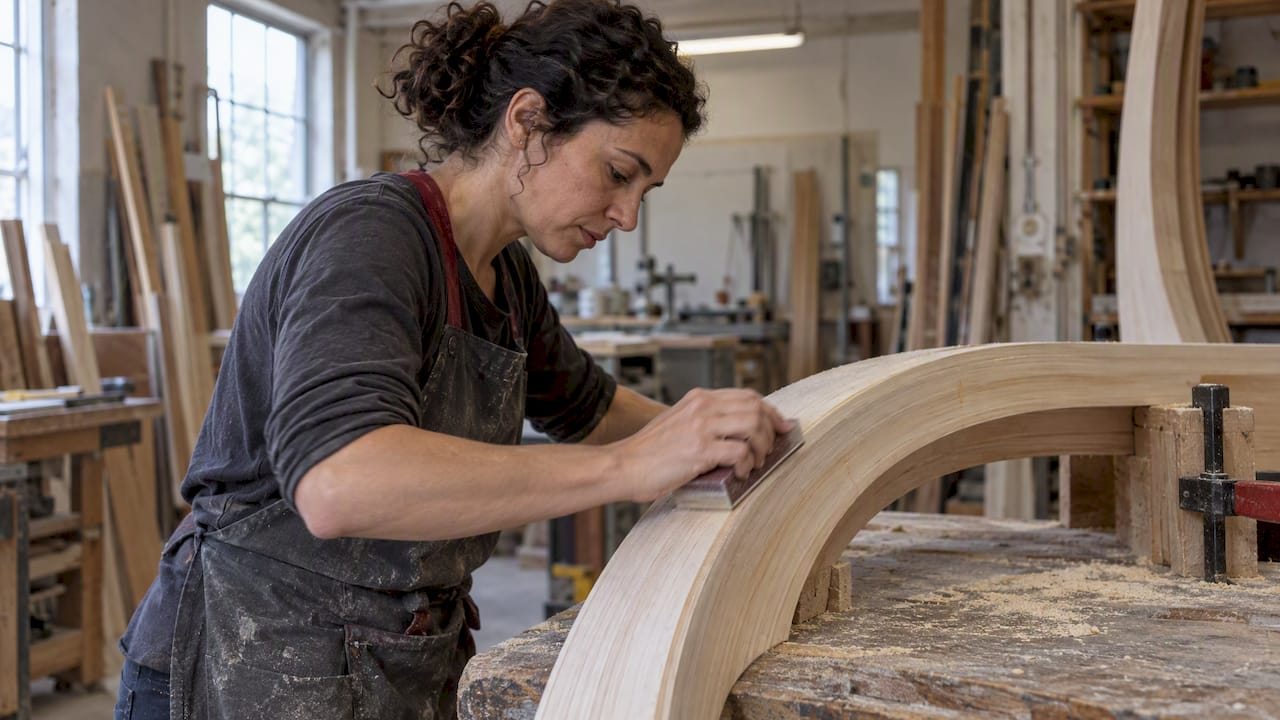
Color-matched fillers and careful staining sequence conceal glue lines on ply-laminated and block-laminated pieces, particularly where edge-grain lines follow the curve and sit less conspicuously than a kerfed flat. Pre-finishing or back-priming faces that become hard to reach after assembly, such as the inner easements of a narrow arched sash, protects the finish and avoids rework once the piece is installed.
Quality control on radius work should include a sightline check against the template, an adhesion test on sample laminate, and, for performance-critical assemblies, a prototype sent for independent verification before full production proceeds.
Historic preservation considerations: matching originals and review approval
The Secretary of the Interior’s Standards for Rehabilitation call for replacement work to match the original in design, material, and visual quality, reserving full replacement for elements too deteriorated to repair. The NPS technical note on replacement wood sash describes shops building full-scale templates, grinding custom knives, and producing a prototype window before committing to a production run. Preservation Brief 9 adds that splicing, custom milling, and economies of scale on larger projects are standard tools in this kind of work.
- Match original material species and grain character, not just the visible profile.
- Submit templates and mock-ups for agency review before production begins.
- Document the approval record carefully, since tax-credit projects depend on it.
When original stock dimensions fall short, segmented laminations and bandsawn sections joined with custom knife work let a shop hold the sightline and strength the design calls for.
Pro Tip: Run a sanding and stain trial on a sample laminate before committing to full production. It catches glue-line visibility problems while they are still cheap to fix.
Gepetto’s checklist for specifying radius millwork in contract documents
A short checklist for specifying radius millwork in contract documents includes requiring full-scale templates and an approved mock-up before production, clarifying ownership of custom-ground knives, and explicitly setting installation tolerances.
Build knife-grinding and form-construction time into the schedule from the start, and phase a mock-up approval before committing to final runs. Proper documentation from template to installed piece and coordination with preservation review bodies helps ensure the paper trail matches the work on the wall.
— Gepetto
Gepetto services: custom radius millwork and historic replication
Radius work rewards a shop that treats templates, knife work, and mock-ups as standard practice rather than an upcharge. Custom radius millwork often includes arched sash, curved casings, and replicated historic profiles, typically accompanied by documentation suitable for preservation review and tax-credit projects.
- Request shop drawings and a full-scale mock-up before committing to a production run.
- Coordinate directly with preservation review on material matching and approval sequencing.
- Review our Historic Window Restoration page for arched sash and window-specific radius work.
- See the custom fabrication services page for casework, staircases, and other curved millwork.
Architects and contractors working on a radius element now, whether new construction or a historic facade, can start with a shop drawing request through either page above.
Sources
- AWI QCP / Architectural Woodworking Standards — Section 6 (Radius work)
- NPS Technical Note: Replacement wood sash (Windows No. 21)
- NPS Preservation Brief 9: The Repair of Historic Wooden Windows
- How to rout arches and curved panels — Popular Woodworking
FAQ
What is millwork fabrication?
Millwork fabrication is the shop process of designing, machining, and finishing custom wood elements such as windows, doors, trim, moldings, and staircases for a specific building rather than pulling stock parts off a shelf. It typically moves from shop drawings and templates through machining, assembly, and finishing before installation.
What is a millwork manufacturer?
A millwork manufacturer is a shop that designs and produces custom wood building components, often working from architect drawings, field measurements, and, on preservation projects, matching samples of the original material. Many millwork manufacturers also handle restoration and replication work alongside new fabrication.
Is millwork custom?
Millwork can be either custom-fabricated to a specific building’s dimensions and profiles or sourced as stock trim and molding. Radius elements like arched casings and curved sash are almost always custom, since a standard stock profile cannot follow a bespoke curve or match a historic original.
What is custom architectural millwork?
Custom architectural millwork refers to wood building elements, trim, cabinetry, windows, doors, and staircases among them, designed and fabricated for a particular project rather than selected from a catalog. On historic buildings, it often includes matching an original profile in material, grain, and visual quality under standards such as the Secretary of the Interior’s Standards for Rehabilitation.
How tight a radius can millwork be fabricated to?
The achievable radius depends on the method and species: ply-lamination with thin plies and a bendable species like mahogany can follow a tighter curve than solid machining or block-lamination allow. The AWS standard notes that ply thickness and species set the practical limit, and a sample laminate test is the reliable way to confirm a given radius before committing to production.