
Most antique mortise locks do not need replacing. In the majority of cases the lock case is sound and the fault lies in a worn spring, a dirty mechanism or a misaligned spindle, all of which can be put right on a clean bench with patience and a few hand tools. This guide sets out how to diagnose the problem, take the lock apart without damaging the door, clean and lubricate it, source or make parts, and decide when the work belongs with a specialist rather than in your own workshop.
It is written for owners of historic houses, architects and contractors who have a pre-war or nineteenth-century door with its original hardware and want to keep it working and keep it authentic.
TL;DR
- Most failures come from broken or fatigued springs, gummed old lubricant, loose knobs or a misaligned spindle, not from a ruined lock case.
- Remove the lock from the door carefully: take off the knobs, spindle and cylinder first, then the faceplate, and never pry the case out with a screwdriver.
- Clean with a degreaser, replace every spring while the case is open, and lubricate sparingly with a product suited to the mechanism.
- Older locks were often hand-fitted, so parts rarely interchange; expect to repair or fabricate rather than order a match.
- A general lock change costs far less than careful restoration of a rare lock, but replacement can destroy the historic fabric that makes the door valuable.
Table of Contents
- Why restoration usually beats replacement
- Diagnosing what has gone wrong
- Removing the lock without harming the door
- Opening the case and keeping track of parts
- Cleaning the lock body and internal parts
- Springs, levers and hand-fitted parts
- Lubrication, reassembly and testing
- When to call a specialist
- What mortise lock work costs
- Our perspective at Gepetto
- When the door needs more than a lock
- Frequently asked questions
- Sources
Why restoration usually beats replacement
A mortise lock sits inside a pocket cut into the edge of the door stile, and the mechanism is a self-contained case of levers, springs, a latch bolt and often a deadbolt. In a nineteenth-century house, that case is frequently the oldest working machine the occupants touch every day. Its escutcheons, knobs and keyhole covers are part of the room’s character, and on a listed or tax-credit project they may be part of the record the reviewer expects to see preserved.
There is also a practical argument. Older mortise locks could be individually built, with parts hand-filed to fit and no interchange between locks, which means a modern replacement case seldom matches the original pocket. Fitting one usually means enlarging the mortise, and each enlargement removes original wood. Practitioners who service pre-war hardware report that in most calls the case is sound and the fault is a serviceable part or an alignment problem. Repair is therefore not only the more respectful route; it is, in most cases, the more probable one to succeed.
For wider context on repairing rather than replacing original fabric, the National Park Service’s Preservation Briefs are the standard reference that preservation professionals use when they weigh repair against replacement for historic building elements.
Diagnosing what has gone wrong
Before a single screw is turned, find out what the lock is actually doing. Test it with the door open, because a lock that fails in the door may work perfectly on the bench, and the reverse is also true. The common complaints are keys that no longer work, loose or spinning doorknobs, misaligned or damaged components, sticking operation and worn internal mechanisms.
| Symptom | Likely cause | First check |
|---|---|---|
| Knob spins freely, latch does not retract | Loose set screw, worn spindle or knob shank | Tighten the set screw; inspect the spindle for rounded corners |
| Latch does not spring back | Broken or fatigued latch spring | Open the case and test each spring by hand |
| Knob turns stiffly or sticks | Hardened grease, dirt, bent lever | Look for gummed residue and burrs on moving parts |
| Key turns but bolt does not move | Worn or bent lever, loose internal component | Check the levers and the bolt tail inside the case |
| Latch catches on the strike | Door sag or strike misalignment | Close the door slowly and watch where the latch meets the strike |
Internal wear tends to show itself as broken or fatigued springs that fail to return the latch, corroded or bent internal levers, and components that float loosely within the case. Keep in mind that a door which has dropped on its hinges, or a frame that has moved with seasonal humidity, can imitate a lock fault entirely. If the latch only sticks when the door is closed, look at the hinges and the strike plate before blaming the mechanism.
Removing the lock without harming the door
Many antique mortise locks are handmade, one-of-a-kind pieces, and the door they sit in is usually older and more valuable than any replacement lock. Do not pry them from the door with a screwdriver, which can scratch the hardware and the door alike.
The sequence that protects both runs as follows:
- Photograph everything before you start: the faceplate, the knob arrangement, the escutcheons and the side of the door the lock faces. Note which way the latch bevel points.
- Release the knobs and spindle. Loosen the set screws, withdraw the knobs and the spindle, and keep them together in a labeled bag.
- Take out the cylinder or thumb turn if the lock has one, along with any trim rings.
- Unscrew the faceplate on the door edge. Old screws are often painted over; clear the slot with a pick before turning, so you do not strip the head.
- Slide the lockbox out of the mortise, wiggling it gently. If it resists, look for a paint bridge between faceplate and wood and score it with a thin blade rather than forcing the case.
If a lock has been painted shut over a century of repaints, work slowly, because chipped paint on the door edge is easier to repair than a cracked stile.
Opening the case and keeping track of parts
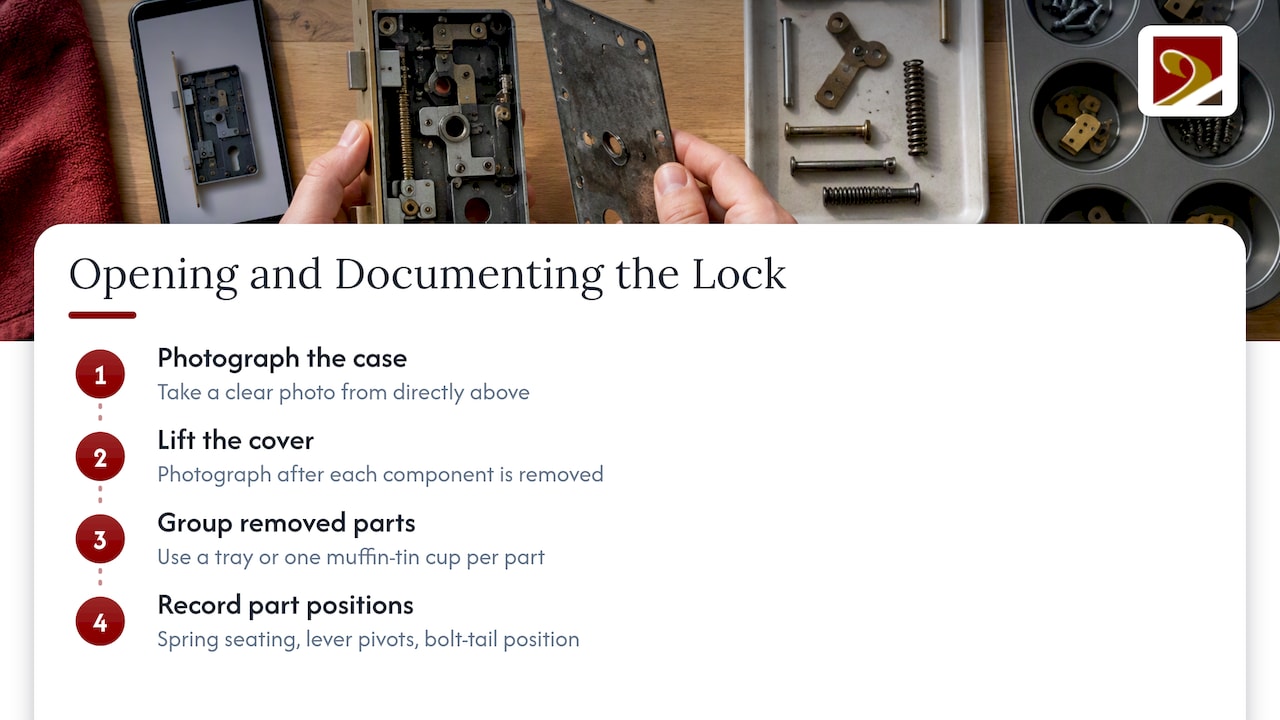
Place the lock on a clean, flat surface under good light, and keep track of small parts, because pieces may fall out when the cover is lifted. A tray lined with a white cloth, or a muffin tin with one part group per cup, prevents the usual losses. Before lifting the cover plate, take a clear photograph from directly above, and then another after each component you remove.
Most cases are closed by a few screws or small rivets. If a cover is riveted, think carefully before drilling; some can be retained and re-secured with screws of matching head type, which is reversible and keeps the original look. Note how each spring is seated, which way each lever pivots and where the bolt tail rides, because the order of reassembly matters more than any single repair.
Cleaning the lock body and internal parts
Hard grease, old oil, rust dust and decades of paint overspray are the real enemies of an old mortise lock. The aim is to remove them without removing metal.
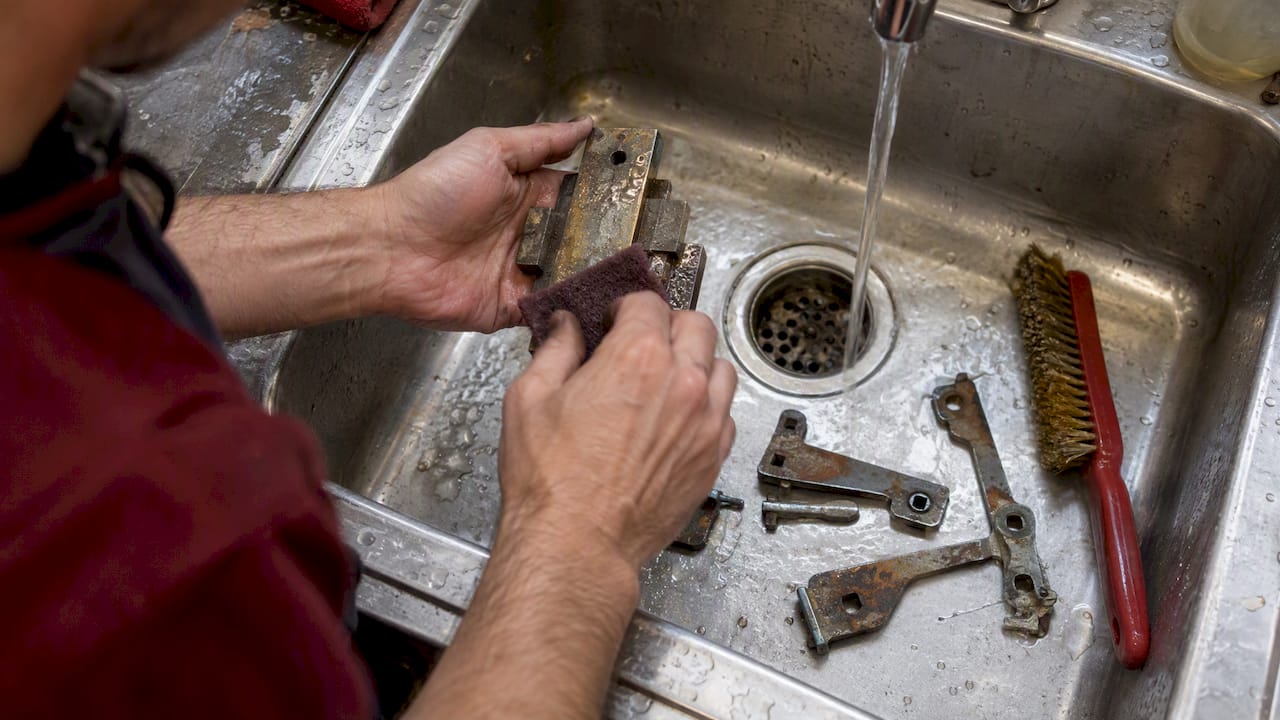
Degrease first. The standard advice is to clean all parts thoroughly with a degreaser. Work part by part, using a soft brush and lint-free rag, and dry everything fully before reassembly. Brass and bronze components tolerate a mild soap bath; steel levers and springs should be dried at once to prevent flash rust.
Treat rust gently. Light surface rust on levers and the bolt can be lifted with fine abrasive pads or a brass brush. Avoid aggressive wire wheels, which round off the edges that engage the levers and change how the lock behaves. Pitted parts are better kept than ground smooth; a little pitting does not stop a lever working.
Leave original finishes alone where you can. Japanned, lacquered or hand-polished exterior hardware has its own patina. Strip and refinish only when the finish has failed, and do not polish bronze to a mirror shine on a historic door if the surrounding hardware is mellowed.
Mind the warnings from practitioners. Among working locksmiths there is real disagreement about sprays: some use light penetrating oil for cleaning, others insist it dries to a gum that attracts dust. The safe approach is to treat any spray as a cleaner, wipe it away completely and then lubricate the clean metal with a purpose-made dry or light lubricant. Never leave a thick, sticky layer in the case.
Springs, levers and hand-fitted parts
Broken springs are the single most frequent cause of a failing mortise lock, and a spring that has not yet broken has usually lost tension. Since the case is already open, replace the full set rather than one at a time. Springs can be made from music wire or spring steel to match the original profile and coil count; a tool-and-die hobbyist or a metalworker with a small coil winder can produce them quickly.
Where a lever is bent, a careful bend back on a soft-jawed vise with light taps can restore it, provided the metal is not cracked. Where a part is missing or broken, consider these routes in order:
- Repair in place: braze, solder or peen a worn edge, then file to the original profile.
- Salvage: take a matching part from a similar donor lock, remembering that, with hand-filed parts, even apparent twins may need fitting.
- Fabricate: cut a new part from the same type of metal using the original as a pattern.
- Reproduction hardware: appropriate for missing knobs, escutcheons and strike plates, less so for the mechanism of a rare lock.
Whatever route you take, keep the discarded original parts, labeled, in a bag taped inside the door’s jamb or filed in the project record. Reviewers and future owners will thank you.
Lubrication, reassembly and testing
Reassemble in the reverse order of your photographs, and operate each component by hand before the cover goes on. The latch bolt should retract fully and snap forward cleanly, and the deadbolt should throw and withdraw without drag.
Apply lubricant sparingly at contact points only: the bolt faces, lever pivots, spring ends and the spindle bearing. Dry graphite is the traditional choice for the case, and a light machine oil suits the key cylinder only if the manufacturer allows it. Avoid heavy grease, which mixes with dust and returns the lock to its former condition within a few seasons.
Two checks save a second removal:
- Spindle height. The spindle should sit at the vertical center of its opening, otherwise the knobs will bind or tilt.
- Test with the door open. Operate the lock several times, then the key, before reinstalling it.
When the lock goes back, tighten the faceplate screws only enough to seat the plate. Then test it with the door closed and listen for the latch meeting the strike. If it catches, adjust the strike plate before you touch the mechanism again.
When to call a specialist
Some jobs reward patience, and others reward experience. Consider a locksmith with historic-hardware experience when the lock is rare, the key mechanism is complex, the original cylinder is worn, or electronic upgrades are involved. Servicing present-day mortise locks, including electronic upgrades and repair of malfunctions, is typically done in a controlled environment such as a cleared workbench.
The door itself is a separate question. Retrofitting a mortise lock into a wood door is labor-intensive and typically requires a specially designed router and brace operated by a specially trained technician. If a mortise pocket has been enlarged by an earlier, careless replacement, if the stile has split around the lockbox, or if a door needs a new mortise cut to take reproduction hardware, that is joinery rather than locksmithing, and it is where a millwork shop is the right call.
What mortise lock work costs
Readers often ask what it costs to replace a mortise lock, and the honest answer depends on what you mean by replace. For general residential lock changes, one cost guide puts full lock replacement at roughly $80 to $225 per door, including parts and labor, with locksmith service calls running $60 to $140. That figure describes common modern hardware, and it is the wrong benchmark for a mortise lock in a historic door, where the case, trim and mortise must all agree.
Restoration of a rare or hand-built lock is priced by the hour and by the complexity of the parts, not by the unit. It can exceed the price of a generic replacement, yet it avoids three hidden costs: enlarging the mortise, losing original hardware that a preservation reviewer may expect to be retained, and replacing matching trim that no longer fits the new lock. On a tax-credit project, those considerations often settle the question before price does.
Our perspective at Gepetto
We spend our days on the wooden side of the lock: doors, stiles, rails, jambs, casings and the mortises that receive the hardware. After years of working on period buildings, one observation holds steadily. A mortise lock rarely fails alone. A sagging door, a swollen stile or a mortise that a previous owner widened for a modern lockbox will defeat even a perfectly rebuilt mechanism.
So we treat the lock and the door as one assembly. When we restore or replicate a historic door, we cut the mortise to the lock the building actually had, we match the stile and rail proportions to the period, and we leave the original hardware in place wherever it can be saved. Where an original door is too far gone, we fabricate a replica using authentic materials and joinery, sized to take the existing lockset, so the hardware can move to the new door without alteration. This is the same approach we take to matching historic features for projects that seek historic tax credit eligibility: the reviewer sees continuity, and the owner keeps what is irreplaceable.
Our advice to architects and contractors is simple. Document the lock before anyone touches it, repair the mechanism before considering replacement, and bring the joiner into the conversation before the locksmith cuts anything new.
— Gepetto
When the door needs more than a lock
If your inspection reveals a split stile, a ruined mortise or a door that cannot carry its hardware any longer, we can restore the door or build an accurate replica that accepts your original lock. See our historic wooden doors or tell us about the project through our custom fabrication services. For the joinery behind a door that will last, our notes on hand hewn mortise and tenon doors show how we build stiles and rails to carry heavy hardware for generations.
Frequently asked questions
Can a mortise lock be replaced?
Yes, but a replacement lock must fit the existing pocket, backset and faceplate, and older doors were often cut for a specific hand-fitted lock. A modern case may force you to enlarge the mortise, removing original wood. Repairing the original is usually less invasive.
How much does it cost to replace a mortise lock?
A general lock replacement averages $80 to $225 per door including parts and labor, though that covers common hardware. Historic or hand-built mortise locks are priced by the work involved, and a fitted replacement often requires woodwork on the door as well.
Why not use WD-40 on locks?
Locksmiths disagree, but the common objection is that light sprays can dry into a gum that holds dust. Use a spray only to clean, wipe it off fully, and then lubricate sparingly with dry graphite or a lubricant meant for the mechanism.
Should I replace all the springs in an old mortise lock?
Usually, yes. Broken springs are the most common reason these locks stop working, and the others in the case have often lost tension. Because the lock is already open, replacing the full set costs little extra and prevents a repeat removal.
Sources
- Step-by-Step Guide to Fixing a Mortise Lockset, This Old House
- Servicing and Retrofitting Mortise Locks, Locksmith Ledger
- Mortise Locks Deliver Function and Versatility, Locksmith Ledger
- Preservation Briefs, National Park Service Technical Preservation Services
- How Much Does It Cost to Change Locks?, HomeGuide
- DIY: Restore the Locks on Your Older Home, Great Valley Lock
- Pre-War Mortise Lock Repair: Fix It or Replace It?