
When built-in cabinetry qualifies as a character-defining feature, we recommend repair over replacement, and when replacement becomes unavoidable, only an evidence-based, exact-match replication preserves both the architectural integrity of the room and the project’s standing for historic rehabilitation tax incentives. Professional, documentation-driven restoration protects character and eligibility alike. Treating that cabinetry as disposable millwork risks both.
TL;DR:
- Preservation of historic cabinetry relies on thorough documentation, including measured drawings, photographs, and evidence of physical clues like ghost marks and fastener patterns.
- Repairs should be prioritized over replacement, with full replication only justified when loss exceeds patch repair, and all work must match original profiles, materials, and finishes.
- Early involvement of preservation specialists and the SHPO reduces review delays and ensures documentation aligns with standards before fabrication begins.
- Surface cleaning must be gentle and staged to avoid destroying finish stratigraphy, with destructive methods used only after detailed sampling and documentation.
- Lead paint on pre-1978 cabinetry requires strict containment, proper personnel certification, and careful hazardous waste disposal to ensure safety during restoration.
Table of Contents
- Quick decision checklist: preserve, repair, or commission replication
- Documentation and investigation required before work begins
- Assessment: repair methods and evidence-based replication using physical clues
- Fabrication, finishing, and installation: mockups, moldmaking, and finish matching
- How restoration choices affect tax credit eligibility and HPCA documentation
- Project timeline and cost drivers for restoration and replication work
- Common types of damage and deterioration specific to historic cabinetry
- Recommended cleaning and surface preparation techniques before restoration
- Conservation methods for original wood finishes and hardware
- Safety considerations and handling of lead paint during restoration
- Typical restoration tools and materials specialized for historic cabinets
- Case studies demonstrating successful historic cabinet restorations
- What we bring to historic cabinet restoration projects
- Working with Gepetto Millworks on your restoration project
- FAQ
- Sources
Quick decision checklist: preserve, repair, or commission replication
Before any tool touches a historic built-in, the commissioning team needs to establish what the piece actually is within the building’s history. A cabinet installed during the period of significance carries different weight than a 1980s kitchen renovation layered atop an 1890s dining room, and the National Park Service’s guidance on primary and secondary interior spaces offers the clearest framework for making that distinction. Built-in cabinets, paneled wainscoting, and millwork trim frequently qualify as character-defining elements whose removal or radical alteration can jeopardize a project’s tax credit eligibility.
Once that status is confirmed, the Standards direct the next decision: repair before replace, and replace only in kind.
- Confirm whether the cabinetry falls within the building’s period of significance and whether it appears in historic photographs or architectural surveys.
- Apply a repair-first test: if structural members, face frames, or doors retain at least partial integrity, conservation generally outperforms wholesale replacement.
- Watch for triggers that call for a specialist: missing physical evidence, carved or composition ornament, curved casework, or explicit tax-credit intent.
- Write procurement language that requires documentation packages, approved mockups, and reversible installation methods before fabrication begins.
A contract that skips these items invites costly rework once a reviewer asks for evidence the team never gathered.
Documentation and investigation required before work begins
Every defensible restoration decision rests on a paper trail assembled before demolition or fabrication starts. The NPS documentation requirements for Historic Preservation Certification Applications specify high-resolution color photographs keyed to floor plans, along with drawings sufficient to show existing conditions and proposed work. Reviewers cannot evaluate what they cannot see, and incomplete photo keys are among the most common causes of delayed applications.
A thorough pre-construction investigation typically proceeds in this order:
- Produce measured drawings of the cabinetry’s profiles, dimensions, and relationship to adjoining walls and trim.
- Photograph every elevation, interior surface, and hardware detail, keyed to a plan diagram for the reviewer’s reference.
- Map fastener patterns, ghost marks, and shadow lines left by missing components, since these often substitute for photographic evidence when historic images do not exist.
- Sample painted surfaces in inconspicuous locations to establish a paint stratigraphy sequence before committing to a finish scheme.
- Decide whether on-site scraping and comparison suffice or whether a laboratory cross-section analysis is warranted for a significant or highly visible feature.
Preservation Brief 18 finds that interior rehabilitation projects benefit from engaging professionals with preservation experience and consulting the State Historic Preservation Office early, a step that shapes how the documentation package should be organized from the outset. Early SHPO contact also clarifies how Parts 1 through 3 of the certification application will be sequenced relative to construction, which spares teams from reworking drawings after the fact.
Assessment: repair methods and evidence-based replication using physical clues
Condition assessment separates what can be saved from what must be recreated, and the distinction matters more than it first appears. Consolidation with reversible adhesives, Dutchman patches scarfed into deteriorated rails, and selective splicing of sound stock into damaged stiles all fall under conservation. Full replication becomes necessary only when loss exceeds what a patch repair can credibly restore, structurally or visually.
Where a piece or an entire run of cabinetry is missing outright, the shop’s job shifts from repair to detective work.
- Ghost marks, those shadow outlines left by removed moldings or hardware, often indicate the exact profile and placement of a lost element.
- Fastener holes and their spacing reveal where shelves, brackets, or hinges once sat, even after the hardware itself disappears.
- Surviving fragments elsewhere in the building, such as a matching cabinet in an adjacent room, frequently supply the missing profile without guesswork.
- Species, board width, and joinery method should match the original as closely as sourcing allows, with modern substitutes reserved for concealed structural members rather than visible surfaces.
Pro Tip: Photograph every ghost mark and fastener pattern before cleaning or sanding disturbs it. Once removed, that evidence cannot be recovered.
Preservation Brief 34’s guidance on composition ornament demonstrates how physical evidence and mold-making techniques allow missing decorative elements to be reproduced with precision, a method that applies equally well to carved cabinet ornament. Reviewers who encounter a replacement that diverges from the documented original in profile or material are within their rights to flag it, which can unravel an otherwise sound application.
Fabrication, finishing, and installation: mockups, moldmaking, and finish matching
Production quality hinges on proof points built into the contract rather than assumed from a shop’s reputation. A disciplined fabrication sequence looks like this:
- Build a shop mockup of the proposed profile or joint detail and circulate it to the architect and owner for sign-off before full production begins.
- Install a field mockup in situ when lighting, adjacent trim, or finish sheen cannot be judged accurately in a shop setting.
- Reproduce carved or molded ornament using the molds and casts described in Preservation Brief 34, integrating salvaged fragments where they survive rather than discarding them.
- Match the finish to the paint stratigraphy findings, substituting a safe modern coating only where the original formulation is no longer available or poses a hazard.
- Install replacement or repaired elements using mechanical fasteners and reversible joinery wherever the original construction allows it, so a future conservator can undo the work without damaging adjacent fabric.
Preservation Brief 28 addresses paint analysis and cautions against destructive stripping methods, favoring targeted sampling that preserves the stratigraphy for future reference. A shop that skips this step and repaints from guesswork risks a finish that reads as historically plausible but is not, in fact, accurate, a distinction reviewers are trained to notice.
How restoration choices affect tax credit eligibility and HPCA documentation
The Secretary of the Interior’s Standards for Rehabilitation state plainly that deteriorated historic features should be repaired rather than replaced, and where replacement is unavoidable, the new work must match the old in design, color, texture, and, where feasible, material. Those Standards govern eligibility for the federal historic tax credit program, which makes every decision about a built-in cabinet a decision with financial consequences.
- Repair-first treatments generally simplify the documentation burden and improve certification odds compared with wholesale replacement.
- HPCA submissions move through Part 1, which establishes the building’s historic status, Part 2, which describes proposed rehabilitation work, and Part 3, which certifies completed work matches what was approved.
- Narrative descriptions, drawings, and photographs must align precisely with what gets built, since discrepancies between Part 2 and Part 3 submissions invite additional review.
- Teams that involve the State Historic Preservation Office before construction begins tend to avoid the rework that comes from submitting documentation after the fact.
Projects that treat documentation as an afterthought rather than a parallel workstream routinely lose weeks to review cycles that better preparation would have avoided.
Project timeline and cost drivers for restoration and replication work
A realistic schedule allocates meaningful time to investigation before fabrication starts, since skipping that phase only pushes the cost downstream into change orders. Expect a sequence of condition assessment and documentation, followed by mockup approval, then fabrication, then installation, with each phase gated by a sign-off rather than running concurrently.
- Salvageability drives cost more than any other single factor: a cabinet with sound structural members costs far less to conserve than one requiring full replication.
- Ornament complexity, particularly carved or composition details, adds time for mold-making and finish matching that flat panel work does not require.
- Laboratory paint analysis adds cost but reduces the risk of a finish scheme that fails review or ages poorly.
- Specialty subcontractors, such as a plasterer for composition ornament or a conservator for veneer stabilization, should be scoped and priced separately rather than bundled into a general carpentry allowance.
- Contracts should include a documented mockup sign-off point and a contingency allowance for deterioration discovered only after demolition exposes concealed surfaces.
Common types of damage and deterioration specific to historic cabinetry
Historic built-ins fail in patterns distinct from modern cabinetry, largely because of the materials and construction methods available when they were built. Solid wood face frames and panels move with seasonal humidity far more than engineered sheet goods, which produces the splitting, cupping, and joint separation common in cabinets older than a century. Veneer losses are especially frequent on curved or decorative surfaces, where thin veneer sheets were glued under tension and later failed as hide glue dried out and lost adhesion.
Water infiltration from roof or plumbing failures causes the most severe damage, swelling panels, delaminating veneer, and promoting rot in lower cabinet bases where moisture pools. Insect damage, particularly from powderpost beetles, hollows out structural members from within while leaving surfaces deceptively intact, which is why a tap test or a probe with an awl often reveals more than a visual inspection alone.
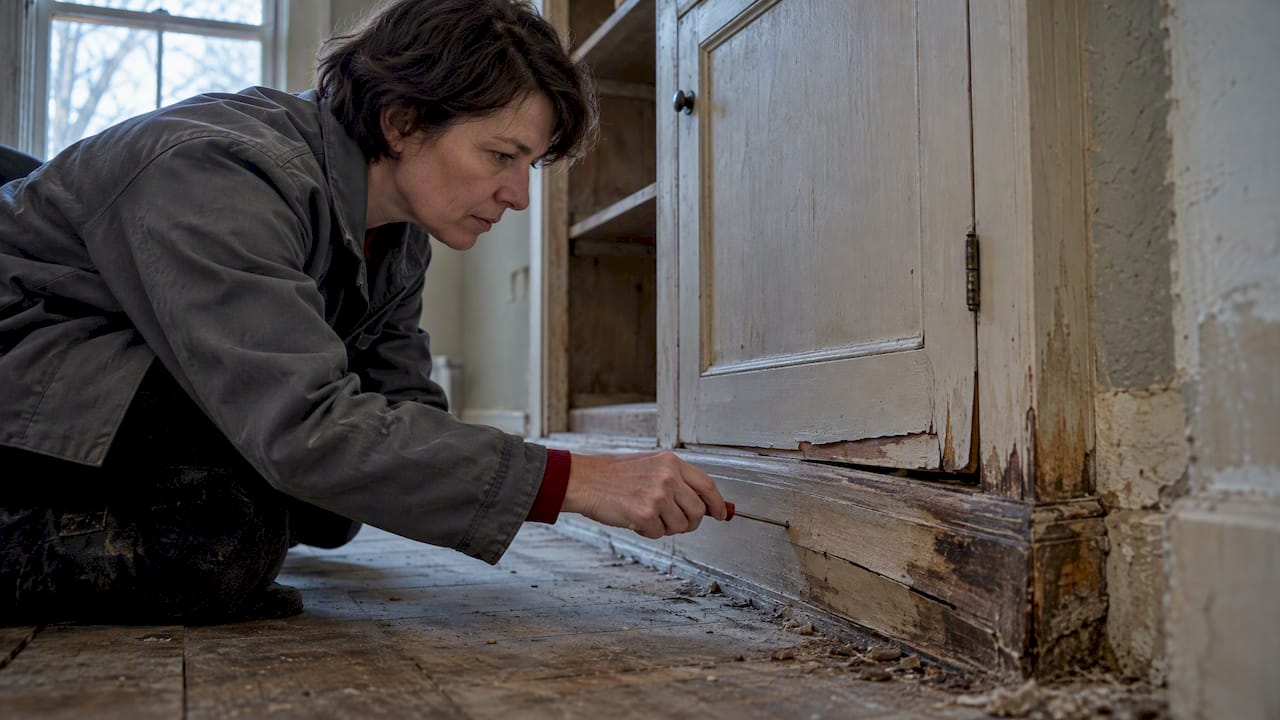
Hardware deterioration compounds the problem: cast brass hinges and pulls corrode or seize, and the screws securing them often strip the surrounding wood after a century of use and reuse. Finish failure, whether through alligatoring shellac, UV-darkened varnish, or repeated overpainting, obscures the wood beneath and frequently masks structural problems that only surface once a conservator begins stripping the finish layers. Each of these failure modes calls for a different repair strategy, which is why an accurate condition assessment precedes any treatment decision.
Recommended cleaning and surface preparation techniques before restoration
Surface preparation on historic cabinetry demands restraint, since aggressive cleaning destroys the same evidence that guides accurate restoration. The sequence should begin with the gentlest method capable of achieving the goal: dry dusting and a soft-bristle brush remove surface grime without disturbing finish or substrate, and only when that proves insufficient should a conservator move to mild aqueous or solvent cleaning.
Mechanical sanding and chemical strippers belong near the end of that sequence, not the beginning, because both methods permanently remove the finish layers that paint stratigraphy analysis depends on. Preservation Brief 28’s guidance against destructive paint removal applies directly here: sampling for analysis should precede any broad stripping, and a conservator should document the existing finish condition with photographs before cleaning begins.
Wax-based cleaners and silicone polishes, common in general furniture care, should be avoided on historic cabinetry because they penetrate wood pores and complicate future conservation or refinishing work. A pH-neutral cleaner, tested first in an inconspicuous area, generally performs the job safely. Where grime has bonded with an old finish, patience and repeated gentle passes outperform a single aggressive treatment, since the goal is removing dirt while leaving the historic finish substrate intact wherever it remains sound.
Conservation methods for original wood finishes and hardware
Original finishes carry evidence of a building’s history that a fresh coat of polyurethane erases permanently, which is why conservation favors stabilization over replacement wherever the existing finish remains structurally sound. Shellac and varnish finishes that have merely dulled or crazed often respond to careful reamalgamation, a technique that reflows the existing finish layer using a compatible solvent rather than stripping it away. This approach preserves the original material and its paint stratigraphy for future reference while restoring clarity and sheen.
Where the existing finish has failed beyond reamalgamation, stripping becomes necessary, but it should follow documented paint or finish sampling so the historic sequence is recorded before it disappears. Replacement finishes should match the original in sheen, color, and application method as closely as practical, following the guidance in Preservation Brief 28 on replicating period finish treatments.
Hardware deserves the same conservative approach. Cast brass hinges, pulls, and escutcheons typically respond to gentle mechanical cleaning and a protective wax coating rather than aggressive polishing, which can remove the original plating or patina permanently. Where hardware is missing, salvaged period pieces or accurate reproductions sourced to match the surviving hardware’s style and era preserve the room’s historic character far better than modern substitutes chosen for convenience.
Safety considerations and handling of lead paint during restoration
Cabinetry finished before 1978 should be treated as presumptively coated with lead-based paint until testing proves otherwise, since lead paint remained in common use for interior woodwork well into the twentieth century. Any sanding, scraping, or heat-stripping of these surfaces generates lead dust and fumes that pose serious health risks, particularly to children and pregnant workers, which is why containment and proper personal protective equipment are not optional steps.
Wet methods, HEPA-filtered sanders, and chemical strippers used under proper ventilation reduce airborne lead dust far more effectively than dry sanding or open-flame heat guns. Work areas should be sealed with plastic sheeting, and debris should be collected and disposed of according to applicable hazardous waste regulations rather than treated as ordinary construction trash.
Paint stratigraphy sampling, the same investigative step that supports accurate finish replication, also identifies which layers contain lead before broader surface preparation begins. This dual purpose makes early sampling worthwhile even on projects with a modest finish-matching budget. Contractors handling pre-1978 interior woodwork should hold appropriate lead-safe certification, and project specifications should require documentation of containment and disposal procedures as a condition of the scope of work.
Typical restoration tools and materials specialized for historic cabinets
Restoring historic cabinetry calls for a different toolkit than general carpentry, built around precision and reversibility rather than speed. Hide glue remains the preferred adhesive for structural repairs on period furniture and built-ins because, unlike modern synthetic adhesives, it can be reversed with gentle heat and moisture, a property conservators rely on when a future repair needs to undo earlier work. Hot hide glue pots, glue injectors for consolidating loose veneer, and clamps sized for delicate joinery round out the adhesive side of the kit.
Hand tools dominate the profile and joinery work: wooden molding planes or scratch stocks reproduce historic profiles that router bits cannot match exactly, while fine-tooth dovetail saws and chisels handle joinery repairs without the tear-out a power tool risks on brittle, century-old stock. Species-matched lumber, sourced to match board width and grain pattern rather than just wood type, forms the raw material for Dutchman patches and splices.
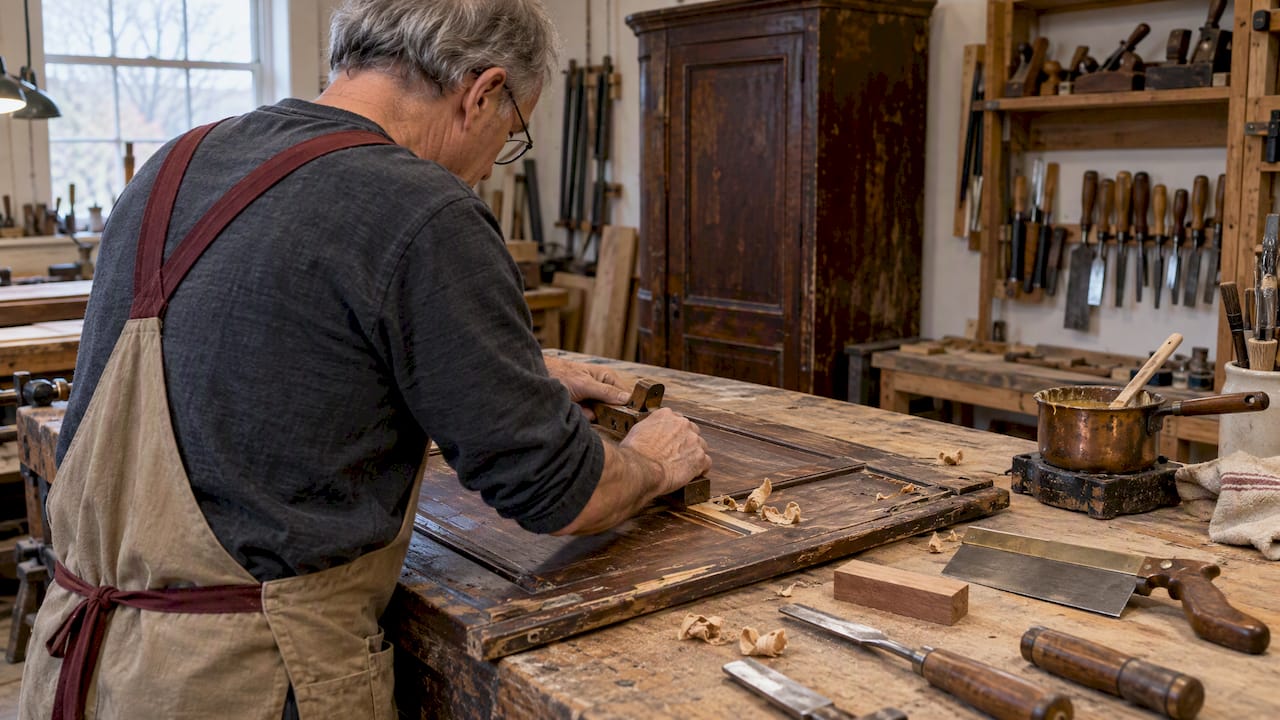
For ornament reproduction, silicone or latex molding compounds capture surviving carved or composition details, which plaster or synthetic casting compounds then reproduce as replacement elements, a technique detailed in Preservation Brief 34’s approach to composition ornament. Paint stratigraphy sampling relies on a scalpel, a binocular microscope for layer examination, and archival sample mounting materials when laboratory analysis is warranted rather than on-site comparison alone.
Case studies demonstrating successful historic cabinet restorations
Our work replicating historic millwork illustrates how these principles play out in practice. Our replica millwork archives document projects where profile matching and ghost-mark evidence guided the reproduction of built-in elements that could not be salvaged in place, preserving the room’s historic proportions without guessing at missing details.
On plantation home restoration projects, our plantation home restoration archives show how built-in cabinetry and casework were conserved or replicated to match surviving fabric elsewhere in the structure, an approach consistent with the repair-first principle the Standards require. Bespoke fabrication work, including custom-designed loft beds and the glass shelves archives showing finish integration techniques, demonstrates the shop capability needed to extend historic cabinetry programs into new, compatible built-in elements without disrupting the room’s original character. Each project reinforces the same lesson: accurate replication depends on evidence gathered before fabrication begins, not after.
What we bring to historic cabinet restoration projects
We specialize in custom millwork for historic building projects, which means our restoration and replication work is built around the same evidence-based approach described throughout this piece rather than treating historic cabinetry as a generic carpentry job, guided by Historic Hardwood Restoration: A Conservation-First Guide. Casework, window, and door restoration experience informs how to approach built-in cabinetry specifically, since the documentation and material-matching disciplines carry across all of it.
Project teams evaluating a restoration partner, our guide to selecting a custom cabinetry shop outlines the criteria worth asking about before signing a contract. We welcome requests for project checklists, mockup samples, and references so architects and contractors can evaluate our fit before committing to a scope.
— Gepetto
Working with Gepetto Millworks on your restoration project
We offer custom casework, historic door and window restoration, and exact-match replication for built-in cabinetry and architectural millwork, all scoped around the documentation and repair-first discipline the Standards require. Rather than treating historic cabinetry as an off-the-shelf product, we build each piece to match the surviving evidence in your specific building.
- Ask us to review your existing documentation packet before fabrication begins, so gaps surface early rather than during HPCA review.
- Request a sample mockup of a proposed profile or joint detail before committing to full production.
- Scope the project in phases, investigation, mockup approval, fabrication, installation, so budget and timeline stay predictable.
For custom casework, replication work, or a broader look at our custom fabrication services, reach out through our project inquiry page to start the conversation.
FAQ
What makes a built-in cabinet “character-defining” under NPS guidance?
A cabinet qualifies as character-defining when it dates to the building’s period of significance and contributes to the historic identity of the space, a distinction the NPS guidance on primary and secondary interior spaces uses to separate original features from later additions. Removing or radically altering such a feature can jeopardize a project’s tax credit eligibility.
Should we always repair historic cabinetry instead of replacing it?
The Secretary of the Interior’s Standards for Rehabilitation direct that deteriorated historic features be repaired rather than replaced whenever repair is feasible. Replacement is reserved for cases where deterioration has progressed beyond what conservation techniques can credibly restore, and even then the new work must match the original in design and material.
What documentation does a Historic Preservation Certification Application require?
The NPS documentation requirements call for high-resolution color photographs keyed to plans, along with drawings sufficient to show existing and proposed conditions, submitted electronically across Parts 1 through 3. Early consultation with the State Historic Preservation Office helps teams sequence this documentation correctly relative to construction.
How do specialists recreate cabinet details that are completely missing?
Specialists rely on physical evidence such as ghost marks, fastener patterns, and surviving fragments elsewhere in the building to determine the missing profile, a method consistent with Preservation Brief 34’s approach to composition ornament. Mold-making from surviving details then allows accurate reproduction of missing carved or decorative elements.
Does Gepetto Millworks handle both restoration and new replication work?
Yes, our services cover both conservation of existing historic cabinetry and exact-match replication when original fabric cannot be saved, scoped through our custom fabrication services. We approach both paths through the same documentation and material-matching discipline that preservation review expects.
Sources
Consult these directly, and contact your SHPO early in planning.
- Identifying Primary and Secondary Interior Spaces in Historic Buildings – Historic Preservation Tax Incentives (U.S. National Park Service)
- Documentation Requirements for Historic Preservation Certification Applications – National Park Service