
In a historic building, the best door threshold is one made for that opening. It is cut to the existing jamb profile, built from a species and section that suits the exterior, and detailed so water drains out and the original sill and subfloor are left intact. Stock aluminum thresholds rarely meet those conditions. They also tend to fight the character of a period entrance. We build historic doors and trim and replicate period features, and the threshold is where the door, the floor and the weather meet, so it deserves the same drawing-level attention as the door itself. For a closer look at profiles, fit and approval, see our page on custom historic door thresholds.
TL;DR
- A threshold is the piece you step over and the door seals against. The sill is the framing member beneath it, and a sill pan is the separate flashing under both.
- On weather-exposed historic exteriors, bronze, stainless steel or a laminated hardwood such as oak serve better than a generic mill-finish extrusion.
- Water control depends on the sill pan and the slope, not on the visible threshold alone.
- Under the ADA Standards, accessible doorways allow thresholds of 1/2 inch, or 3/4 inch for exterior sliding doors, with bevels no steeper than 1:2. Qualified historic buildings have an alternative route where compliance would destroy significance.
- Measure from the inside of the casing and take a template of the jamb profile before anything is cut.
Table of Contents
- What a threshold does, and how it differs from a sill
- Why historic openings rarely suit off-the-shelf thresholds
- Choosing material and profile
- Sizing a custom threshold for the opening
- Making the threshold: what the method looks like
- Keeping water out: the pan matters more than the threshold
- Accessibility and historic fabric
- Where custom threshold work goes wrong
- Working with us on the threshold and the door together
- Our view on thresholds in historic work
- FAQ
- Sources
What a threshold does, and how it differs from a sill
The words are used loosely on job sites, and the confusion causes real errors in drawings and orders. The threshold is the component at the bottom of the doorway that the closed door meets, and it typically works with the door’s bottom seal or sweep. The sill is the lower supporting member of the frame. A Fine Homebuilding discussion describes the sill as the wooden framing piece set against the slab, beveled downward to shed water, while the threshold holds the weatherstripping the door rests on. On a pre-hung metal unit the threshold is the aluminum piece in the frame, and the sill is the member the frame sits upon.
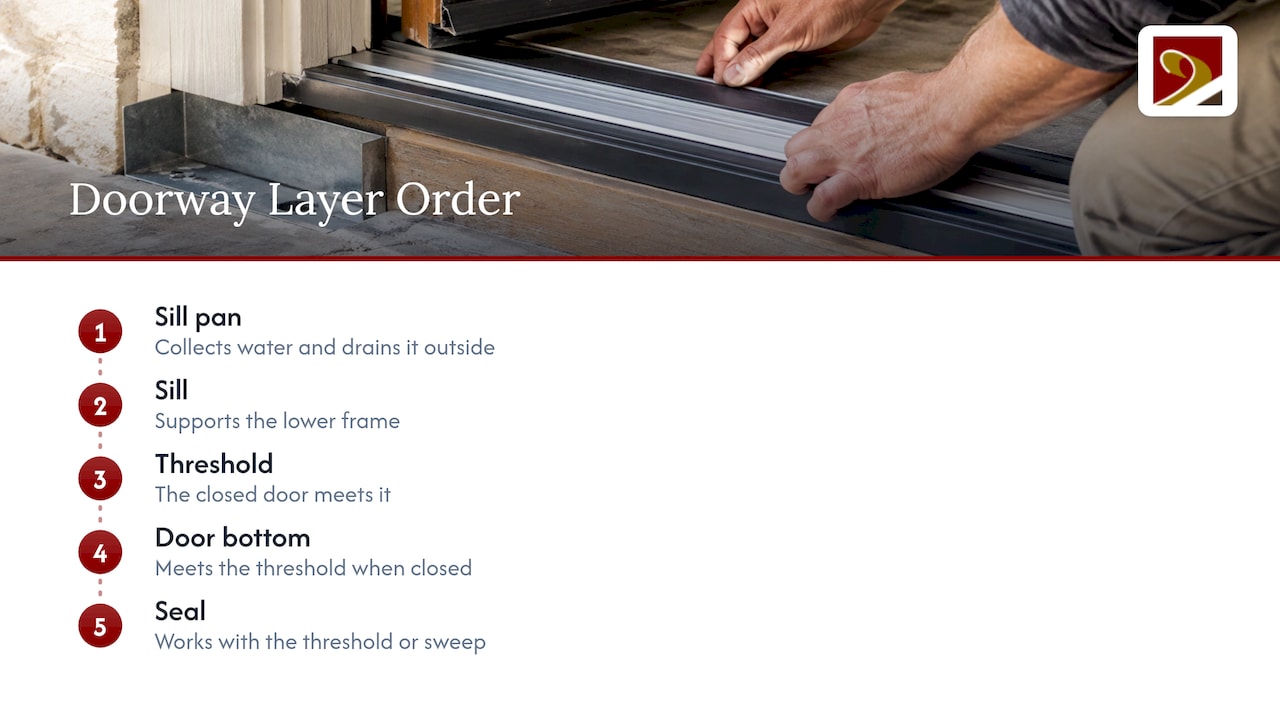
A third layer matters just as much. The IIBEC field guide to window and door flashing explains that ASTM E2112-07 recommends sill pan flashing under all windows and doors in low-rise residential and light commercial buildings. A pan has upturned legs at the interior edge and the ends, so it forms a three-sided tray that collects water and drains it toward the exterior.
When you order a custom threshold, you are therefore specifying one part of a stack: pan, sill, threshold, door bottom and seal. If any layer is left to chance, the others cannot compensate.
Why historic openings rarely suit off-the-shelf thresholds
Older doorways are seldom square, level or standard. Floors have settled, wood frames have moved with the seasons, and successive owners have raised or lowered the interior finish. A stock threshold is made to a catalog width and a fixed profile, so installers trim it, shim it and caulk the gaps. That is how water finds the subfloor.
The preservation standard points the other way. The Secretary of the Interior’s Standards for the Treatment of Historic Properties say wood features important to historic character, doorway surrounds among them, should be identified, retained and preserved. Repair should be by patching, piecing in or limited replacement in kind where surviving prototypes exist. A threshold that is cut to the opening, rather than an opening cut to the threshold, follows that logic. The jamb, casing and sill stay as they are, and the new piece is made to meet them.
This is also where a project’s review file is won or lost. If the work is part of a rehabilitation seeking historic tax credits, the reviewer looks at whether visible new elements are compatible with the historic entrance. We replicate period features and match them for historic tax credit eligibility, and a threshold that echoes the profile of its neighbors is part of that picture.
Choosing material and profile
Metal: bronze and stainless steel
For street-level entrances, Facilities Management Insights cites Richard W. Off in recommending bronze or stainless steel, or at least traffic-grade powder coatings on steel or aluminum, because deicing salts attack street-level hardware. The Secretary of the Interior’s guidelines note that bronze weathers well and appears historically on entrance doors and storefronts. For commercial or storefront-style entries in a historic district, a bronze or stainless saddle with a period-appropriate profile is usually the right conversation to open with.
Wood: laminated oak
On residential entries, a wood threshold looks right under a wood door and meets the floor without a visual break. In a This Old House walkthrough, general contractor Tom Silva explains that laminated oak responds better to weather than a single solid piece because it is more dimensionally stable and wears just as well. The same project builds the threshold from 3/4-inch-thick laminated oak.
Three-piece water-return assemblies
For openings with some protection, Fine Homebuilding contributor Gary M. Katz reports that a three-piece water-return threshold is the safest bet. It consists of a threshold, a drain pan and an interlocking sill cover. The sill cover is the visible, replaceable part, which suits historic work because the finish element can be made to a period profile while the drain pan does the hidden work.
| Situation | Material and profile to discuss | Why |
|---|---|---|
| Exposed street-level commercial entry | Bronze or stainless saddle | Resists deicing salts and weathers well |
| Residential front door, original wood sill retained | Laminated oak threshold on a pan | Stable, matches wood floors and casing |
| Protected porch or vestibule entry | Three-piece water-return assembly | Drains water outward, replaceable cover |
| Accessible route into a listed building | Low, beveled or interlocking profile | Reduces the level change visually and physically |
Sizing a custom threshold for the opening
Sizing is where custom work earns its name. The sequence below applies whether the threshold is wood or metal.
- Measure the opening from inside the casing, not from the floor finish. Katz’s threshold replacement guide measures the clear opening between the casings and adds a small allowance, for example 1/16 inch, for touch-up fitting.
- Take the jamb profile off the building. The same guide transfers the jamb profile to the threshold ends with a template. In a historic opening the profile may be molded or irregular, so a physical template beats a dimension.
- Record the floor heights on both sides. Note the finished interior floor, the subfloor, and the exterior landing or porch deck. The difference sets the threshold’s height, the slope of the top, and whether the underside needs a rabbet to overlap the flooring.
- Check the door bottom. Scribe the door at threshold height plus 1/8 inch, as the This Old House method does, and decide whether the door will close on a threshold insert or a sweep. Katz notes that a threshold without a rubber insert should have a smooth, low-profile top and a slightly concave underside for good floor contact, and that an insert is for doors lacking a weather-sealing sweep.
- Verify the subfloor. The sill area has to be flat, level and solid before any threshold goes down. Rot beneath an old sill is common and should be repaired before the finish piece is made.
- Measure more than once. Old wood frames and floors move seasonally, so a second measurement at a different time of year is a sensible check on a long project.
On a project with architects, builders and a restoration contractor involved, one person should own the template and the floor-height record. When we fabricate doors and trim for a historic opening, the threshold is drawn against those same measurements.
Making the threshold: what the method looks like
For a wood threshold, the method published by This Old House is a useful baseline. The door is scribed and cut, and the exposed grain on the door bottom is sealed. The threshold is cut to length against the casing, its top edges are beveled at 45 degrees, and a rabbet is cut in the underside to overlap the existing flooring. After fitting the ends, sanding and sealing, it is set in construction adhesive, nailed and finished with a door sweep.
The weak point on historic jobs is the ends. Where the threshold meets a molded jamb or a plinth block, a square cut leaves a gap. This is why the template step matters, and why a cabinetmaker’s fit is better than a field trim.
Keeping water out: the pan matters more than the threshold
A threshold is not a waterproofing system by itself. Silva recommends waterproofing the exposed sill and subfloor with self-adhesive rubberized membrane as flexible flashing, because water splashes up in front of the door, gets under the threshold and rots the sill. His installation guide adds a bead of caulk under the threshold so no water weeps beneath it, a step he calls easy to overlook but critical to protecting the subfloor. Katz runs silicone under the sill cover and a second bead on top of it, beneath the drain pan and kept clear of the pan’s front edge.
The IIBEC guide singles out one performance factor: the height of the pan’s rear leg, which resists wind driving water uphill. It also notes that a low-performance door can be backed by a sill pan with a higher rear leg. On an exposed historic elevation, that is worth specifying on the drawing.
A practical way to diagnose a leak is to separate its causes. Water pooling at the door may mean the threshold is pitched the wrong way or a drip detail is missing. Drafts, by contrast, usually come from worn weatherstripping rather than from the threshold. Fix the cause before you order a replacement.
Accessibility and historic fabric
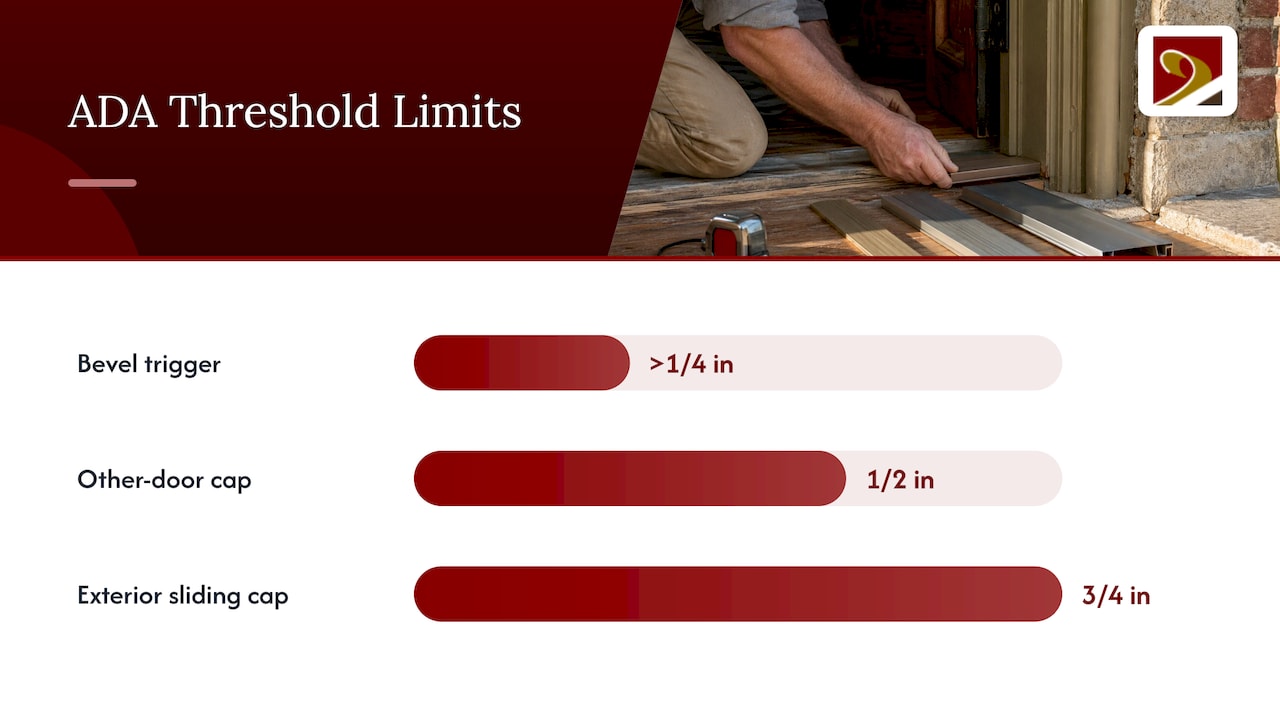
Most public and commercial buildings, and many rehabilitated residences that are open to the public, have to deal with thresholds under the ADA. The ADA Standards excerpt (Section 4.13.8) caps thresholds at 3/4 inch for exterior sliding doors and 1/2 inch for other doors at accessible doorways, with bevels no steeper than 1:2. Any threshold taller than 1/4 inch generally needs that bevel, as UpCodes’ guidance summarizes.
For historic buildings, Section 4.1.7, reproduced in a municipal ADA manual, says alterations to a qualified historic building, meaning one listed or eligible for the National Register or designated under state or local law, must comply unless it is determined that compliance would threaten or destroy historic significance. In that case alternative requirements may be used.
NPS Preservation Brief 32 is specific about thresholds. If one exceeds the generally allowable 1/2 inch, it can be altered or replaced with a threshold that meets accessibility requirements. If the existing threshold is significant, a bevel can be added to each side to reduce its height, or it can be replaced with an accessible threshold that is visually compatible with the historic entrance.
That is precisely the brief for a custom piece. UpCodes also notes that even a code-compliant 3/4-inch beveled threshold is very hard for some wheelchair users, and suggests a low interior rise of at most 1/4 inch with the drop taken outside, or an interlocking threshold that brings the exterior surface up to interior floor level while still managing water.
Codes are adopted and amended locally, and a state or local jurisdiction may differ from the model codes. Confirm the enforced edition with the building official, and for tax-credit projects, with the State Historic Preservation Office, before drawings are finalized. The California Building Code, for example, changed its accessibility provisions effective January 1, 2026, so a project there is not governed by the same text as one in Virginia or the Carolinas.
Where custom threshold work goes wrong
- Specifying by catalog width. The opening is never the catalog dimension. Template first, order second.
- Treating caulk as flashing. Sealant joints age. The drainage path must work without them.
- Ignoring the door bottom. A threshold sealed to a door whose bottom grain is bare will fail from the door side.
- Raising the threshold to solve a floor problem. It creates an accessibility and tripping issue and often a review comment.
- Replacing a significant original. Bevel or retain first, as Preservation Brief 32 advises, and replace only with a compatible profile.
Working with us on the threshold and the door together
A threshold decision rarely stands alone. It is tied to the door’s bottom rail, the casing, the sill condition and sometimes the stair or porch beyond. We design and fabricate custom wood doors, windows, trim and period stairs for historic buildings, and our work includes replicating period features and matching for historic tax credit eligibility. Architects and contractors can bring us the opening, the drawings or the review comments, and we will build the door and its surrounding millwork as one coordinated set. Start with our historic doors offer or our custom fabrication services.

For a historic wood door that needs restoration rather than replacement, see our restoration of solid wood doors, and for entries in Richmond and the surrounding area, our historic wooden doors.
Our view on thresholds in historic work
We treat the threshold as part of the door, because that is how the building was made. In a period entrance the sill, the casing and the door bottom were fitted to one another by hand, and the best replacement work repeats that logic.
Our approach is to start from the opening as it stands: the template, the floor heights, the condition of the sill beneath. From there we can make the door, the trim and the threshold to the same drawing, in materials and profiles that suit the period and that reviewers can read as compatible. Because we replicate period features and match work for historic tax credit eligibility, we write the threshold into the same documentation as the rest of the entrance.
Architects and builders who bring us the door and the threshold together get one fit rather than three trades meeting at a gap. That is the case for custom work in a historic building: nothing in the entrance has to be forced.
Gepetto
FAQ
What is the difference between a door threshold and a sill?
The threshold is the piece at the bottom of the doorway that the closed door meets and that you step over. The sill is the framing member beneath it, often wood against a slab, sloped to shed water. A sill pan is the separate flashing below that collects and drains any water that gets through.
What is the best material for a historic exterior threshold?
On exposed street-level entries, bronze or stainless steel hold up against deicing salts, and bronze has a long history on entrance doors. For a residential wood door, laminated oak is more dimensionally stable than a single solid piece. The right choice depends on exposure, the door and the review requirements.
How do you size a custom threshold?
Measure the opening from the inside of the casings, take a template of the jamb profile, and record the floor heights on both sides. Check the door bottom and the sweep or insert it will close against, and confirm the subfloor is flat and sound. Then allow a small margin for final fitting.
How high can a threshold be under the ADA?
At accessible doorways the ADA Standards allow 1/2 inch for most doors and 3/4 inch for exterior sliding doors, with a bevel no steeper than 1:2 on anything above 1/4 inch. Qualified historic buildings may use alternative requirements where compliance would threaten or destroy historic significance. Confirm local rules with the building official.
Sources
- Fine Homebuilding: threshold vs door sill
- IIBEC: A Flash In The Pan, a field guide for windows and doors
- NPS: Secretary of the Interior’s Standards for the Treatment of Historic Properties
- Facilities Management Insights: Specifying Door Hardware for Historic Buildings
- This Old House: How to Make an Exterior Door Threshold
- Fine Homebuilding: Retrofitting a Threshold
- Fine Homebuilding: Replacing a Door Threshold
- This Old House: How To Install a New Threshold
- ADA Standards excerpt, 28 CFR Part 36
- ADA Standards historic preservation provision, Section 4.1.7
- NPS Preservation Brief 32: Making Historic Properties Accessible
- UpCodes: Thresholds and Accessible Routes at Exterior Doors