
The best paint removal on historic wood removes the least paint possible. The National Park Service’s guidance is to take coatings off only to the next sound layer, with the gentlest means available, and to strip to bare wood only when a surface is painted shut or new wood is being pieced in. Before any stripper or heat gun comes out, two questions decide the job: is removal necessary at all, and is there lead in the paint? When the wood itself has gone past saving, the answer is repair, restoration or an exact replica, which is the work we do at Gepetto Millworks on windows, doors, trim and stairs.
TL;DR
- Classify the paint failure first. Minor blemishes need no removal, a failing top layer needs limited removal, and only multiple-layer failure justifies stripping the whole surface.
- In a pre-1978 building, treat the paint as lead-based until a certified inspector, or a certified renovator using an EPA-recognized method, shows it is not. Contractors working for pay must follow the EPA’s lead-safe rules.
- Never use open flame, dry sanding, or a heat gun above 1100°F. Favor hand scraping, wet methods, low heat, and chemical strippers other than methylene chloride.
- Clean up with HEPA vacuuming and wet washing, then prime and repaint promptly so the bare wood is protected.
- If scraping reveals rot, broken joints or missing profiles, the job has moved from paint removal to restoration or replication.
Table of Contents
- First decide whether the paint needs to come off
- Test for lead before you touch anything
- Choosing a method that spares the wood
- Working with a chemical stripper, step by step
- Cleanup and preparation for repainting
- When the stripping reveals more than paint
- Work with us on the parts that cannot be saved
- Our view on stripping historic wood
- Frequently asked questions
- Sources
First decide whether the paint needs to come off
Historic woodwork usually carries a century or more of coatings, and those layers are part of the building’s record: early color schemes, tool marks, and the original surface itself. Preservation Brief 10, published by the National Park Service, states that paint removal from historic buildings should be avoided unless absolutely essential, apart from cleaning, light scraping and hand sanding as routine maintenance.
The Brief gives a practical way to judge each element of painted woodwork. Confirm first that the surface really is wood and that the wood is not decayed. Then sort what you see into three classes:
| Condition | What it looks like | What it calls for |
|---|---|---|
| Class I | Minor blemishes | No paint removal |
| Class II | Failure of the top layer only | Limited removal, to the next sound layer |
| Class III | Substantial failure through multiple layers | Total removal |
The National Center for Preservation Technology and Training adds that the Secretary of the Interior’s Standards recommend against removing paint without paint-surface deterioration, favor repairing deteriorated wood over replacing it, and do not advocate sanding weathered wood back to bare wood. It recommends a survey of both paint and substrate conditions to set the level of intervention.
For an architect or contractor, that survey is the document that protects the project. It records why each element was treated as it was, which matters for reviewers on a historic tax credit project as well as for the owner.
If the existing finish is sound and the only issue is a stain that no longer matches, our guide on matching stain on old trim without stripping sound finishes covers that case.
Test for lead before you touch anything
Old paint on historic wood is likely to contain lead. The EPA states that 87% of homes built before 1940 and 24% of homes built from 1960 to 1978 have some lead-based paint. Its advice is to assume lead is present in any pre-1978 building or to hire a certified lead-based paint inspector or risk assessor.
Three terms matter here:
- Inspection: locates lead-based paint, using a portable X-ray fluorescence (XRF) machine and laboratory tests of paint samples, according to the EPA’s Protect Your Family booklet.
- Risk assessment: samples deteriorated paint, dust near painted surfaces and bare soil to identify current hazards.
- Recognized test kit: the EPA has recognized three kits, but recognition applies only to use by Lead-Safe Certified renovators.
Virginia’s Department of Historic Resources notes that qualified inspectors or laboratories can confirm lead with an on-site sodium sulfide test or a mobile XRF analyzer, and that commercial laboratory analysis gives the most accurate results, including percentage of lead by weight.
What the federal rule asks of contractors
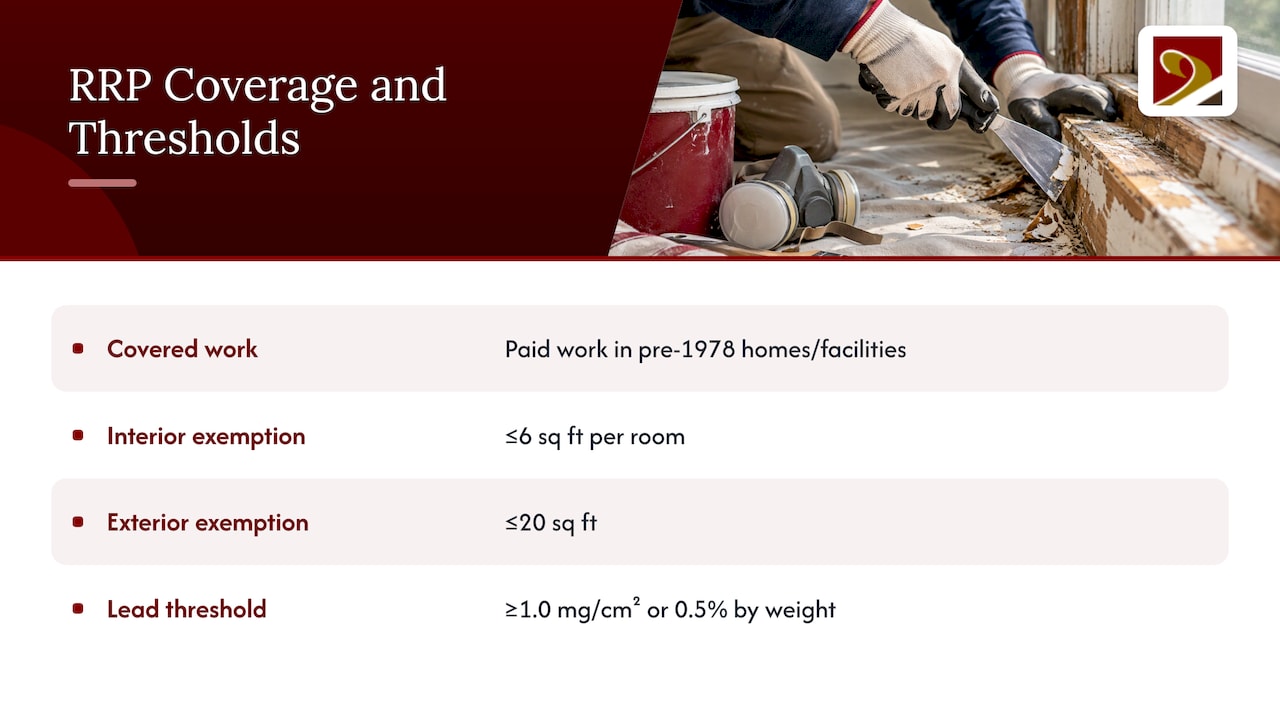
The EPA’s Renovation, Repair and Painting (RRP) rule covers paid work in houses, apartments and child-occupied facilities built before 1978, including paint preparation, window replacement and remodeling. It exempts, among others, minor work disturbing six square feet or less of painted surface per room inside, or 20 square feet or less outside. Testing is not itself required, but the rule applies unless every affected component is determined to be free of paint containing lead at or above 1.0 mg/cm² or 0.5% by weight.
The EPA’s 2026 Steps booklet says every surface affected by a covered renovation must be tested or presumed to contain lead, including surfaces under wallpaper if they will be disturbed. It also notes that HUD’s Lead Safe Housing Rule permits only certified inspectors or risk assessors to make that determination.
In practice that means a certified firm, a trained renovator, a contained work area with posted signs, and cleaning verification at the end. For the four practices that are banned on these jobs, see our summary of lead paint rules for renovation on historic projects.
The regulatory ground has been moving. The EPA’s final rule on lead dust, 89 FR 89416 of October 2024, lowered the dust and hazard thresholds used in lead-paint work, so confirm the current figures with the EPA before you set clearance criteria.
Virginia DHR adds a preservation point: removing lead paint from significant historic features should be considered only when the features are contaminated above regulated levels and the contamination is reasonably accessible to occupants. The cheapest abatement methods are usually not appropriate for older buildings.
Choosing a method that spares the wood
No single method suits every element. Flat clapboard, a carved bracket, a six-over-six sash and a paneled door each behave differently. The table pulls together what HUD, the National Park Service and Historic New England say.
| Method | Where it fits | Cautions |
|---|---|---|
| Hand scraping to the next sound layer | Failing paint on flat or moulded surfaces | Preferred by Historic New England; keep surfaces misted when lead is present |
| Wet sanding of peeling paint | Deteriorated, loose paint | Keep wet but not running |
| HEPA-shrouded mechanical sander | Finish sanding | Shroud held against the surface; not on wood with needle guns or vacuum blasting |
| Low-heat stripping (heat gun) | Multiple layers on siding and trim | Never above 1100°F; lowest effective setting; fire extinguisher at hand |
| Chemical stripper | Mouldings, carving, windows, brackets | Not methylene chloride; test a small area; ventilate |
| Off-site stripping | Removable doors, sashes, mantels, balusters | Heat or chemical, done where containment is easier |
HUD’s chapter on lead-based paint and historic preservation recommends exactly these approaches: wet sanding of deteriorated peeling paint, finish sanding with HEPA-vacuum mechanical sanders, low-heat stripping, chemical strippers except methylene chloride, and off-site stripping. It also says to avoid harsh abrasive cleaners that can damage historic materials, and never to use open flame, high-heat removal or dry sanding.
Heat guns, with limits
An NPS technical note on paint removal from wood siding explains why a heat gun was chosen over a radiant plate: the heat is controllable, the working surface stays in view, and every layer can be softened and lifted down to the original surface in one pass without mechanical damage. Chemicals and scrapers were kept for complex areas such as porch ceilings, soffits, windows and brackets.
Historic New England is more conservative, advising that heat guns never be used on elements still in place and always at the lowest setting, and that infrared strippers be left to trained professionals. Take the stricter reading for fragile or glazed elements. Glass putty, glazing and old joinery suffer most from heat.
What to leave out
Abrasive blasting and power or pressure washing do not belong on historic wood, according to Historic New England. Open-flame burning, and machine sanding or grinding without HEPA exhaust, are prohibited on lead jobs under HUD’s abatement chapter. Dry scraping is allowed only for limited areas.
Working with a chemical stripper, step by step
Chemical strippers earn their place on profiles that scrapers cannot reach without rounding the edges. Here is the routine, with where it tends to go wrong.
- Test a small, inconspicuous area. HUD directs workers to try an on-site stripper on a small patch first. This shows how many layers lift and whether the wood grain reacts. Water-rinsable methylene chloride products, for instance, raise the grain more than regular strippers, as Preservation Brief 10 notes.
- Prepare the area. Contain the floor or ground with sheeting, ventilate, and keep ignition sources away. The Brief warns that solvent-based stripper vapors can be highly toxic if inhaled or absorbed through skin, and that many are flammable.
- Protect yourself. Wear gloves, a face shield and a respirator with organic-solvent filters. Caustic dip-stripping should be left to professional companies, because the solutions can dissolve skin and permanently damage eyes.
- Apply and wait the full period. Follow the manufacturer’s directions and let the product sit as long as the label requires. Dwell time varies by product and by the number of layers, so the label is the authority. Lifting a stripper early is the commonest cause of repeat applications and extra scraping.
- Lift with plastic or dull tools. A blunt putty knife or a plastic scraper protects the surface. Use fine abrasive pads and picks on the moulded areas. Keep wet-scraped debris moist.
- Neutralize or remove residue as the label directs. Gummy residue left on the wood interferes with the new primer.
On lead-containing paint, add the requirements above: containment, certified personnel where the RRP rule applies, and no stripping with volatile products in poorly ventilated spaces.
Cleanup and preparation for repainting
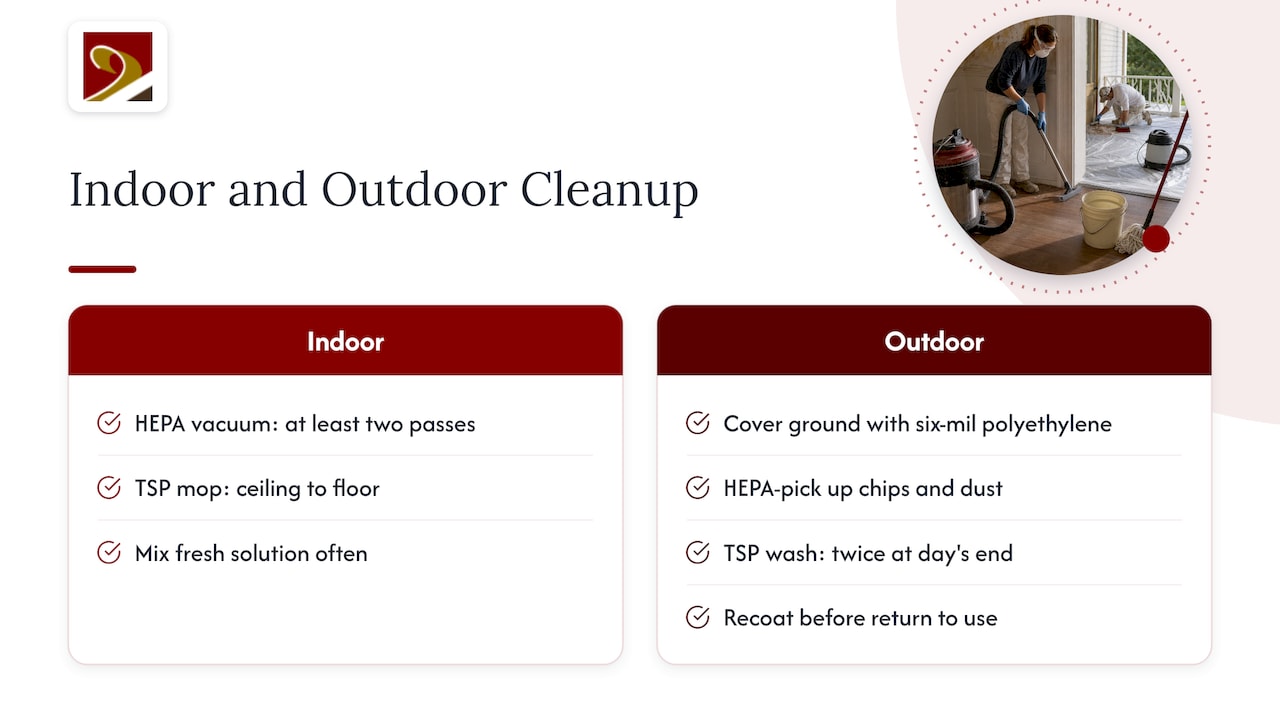
Cleanup carries as much weight as removal on lead jobs. Virginia DHR recommends at least two passes of HEPA vacuuming and wet mopping with a trisodium phosphate (TSP) solution indoors, working from ceiling to floor with fresh solution mixed often. Outdoors, it recommends masking the ground with six-mil polyethylene, HEPA-vacuuming chips and dust, washing surfaces twice with TSP at the end of each work day, and recoating abated surfaces before the spaces return to use.
The EPA’s Small Entity Compliance Guide requires HEPA vacuuming, damp-cloth wiping and mopping that keeps wash water separate from rinse water, followed by cleaning verification.
Preparation then follows Preservation Brief 47: remove loose paint to a sound substrate, rough the surface gently for adhesion, wipe it clean, and repaint with a compatible primer and topcoats within the manufacturer’s temperature range. For washing, use non-abrasive cleaning and low-pressure water from a garden hose rather than high-pressure water.
Bare historic wood should not wait. Prime it while it is dry and clean.
When the stripping reveals more than paint
Stripping often exposes what paint was hiding: soft sill sections, split rails, failed mortise-and-tenon joints, or mouldings worn through. Preservation Brief 10 makes decay the first question for a reason. Paint cannot hold on wood that is failing underneath, and the guidance favors repair over replacement wherever the material allows it.
This is where the work moves from paint removal to millwork:
- Painted-shut sash and failed windows: Our historic window restoration service is built for these.
- Elements beyond repair: A missing or rotted element can be replicated from the original profile. Our wooden windows and custom fabrication cover doors, trim, casework, stairs and balustrades.
- Tax credit projects: We claim expertise in exact replication with authentic materials and techniques, supporting projects aiming at historic preservation tax credit eligibility. Our notes on the historic tax credit go further.
The decision between saving and replacing is easier to make with the wood open in front of you. Architects and contractors who bring us the survey and photographs from the stripping stage can discuss what is repairable and what has to be matched.
Work with us on the parts that cannot be saved
Gepetto Millworks designs, fabricates and restores wood windows, doors, trim, cabinetry, staircases and architectural millwork for historic buildings, including replication of period features. If your paint-removal survey ends with an element that needs restoring or an exact replica, start with our historic window restoration page or send the project details through gepettomillworks.com.

We work with architects, general contractors, builders and historic homeowners across Virginia, the Carolinas, West Virginia, Maryland and the District of Columbia.
Our view on stripping historic wood
Every historic project we see starts with the same temptation: take everything back to bare wood and begin again. Resist it. The layers on a century-old window or door carry its history, and the gentlest treatment that makes the surface sound is nearly always the right one.
What we value is the original profile. A muntin or a mould that has been rounded by aggressive stripping cannot be recovered by paint, and that is when replication becomes necessary. Our work is exact historic replication, using authentic materials and techniques, so that a replacement element stands comfortably beside the original.
Lead adds another reason for care. Plan the removal method, containment and cleanup together with the person who will restore or fabricate the woodwork, so the wood reaches the shop or the installer in the condition the design assumed.
Gepetto
Frequently asked questions
Do I have to strip paint before repainting historic wood?
Not usually. Preservation Brief 10 recommends removing paint only to the next sound layer, and only where it is failing. Sound paint is cleaned, lightly scraped and sanded by hand, then repainted. Full stripping is justified for painted-shut openings or where new wood is pieced in.
Can I use a heat gun on old wood?
Within limits. HUD prohibits open flame and heat guns above 1100°F on lead-containing paint, and Historic New England advises the lowest setting and never on elements still in place. Keep a fire extinguisher at hand and use chemical stripping on glazed or carved areas.
How long do I leave a chemical stripper on?
For the time the manufacturer’s label states. Dwell time varies with the product and the number of paint layers, and HUD directs workers to follow the manufacturer’s directions and wait the required period. Test a small area first to see how the paint responds.
Is a home test kit enough to prove the paint is lead-free?
For work covered by the RRP rule, the EPA has recognized three kits, but only for use by Lead-Safe Certified renovators. HUD-regulated housing requires a certified inspector or risk assessor. If you are unsure, assume lead is present in a pre-1978 building and plan accordingly.
Sources
- Preservation Brief 10: Exterior Paint Problems on Historic Woodwork (NPS)
- Understanding Traditional and Modern Paints and Stains for Historic Buildings (NCPTT, 2014)
- Frequent Questions About Testing for Lead-Based Paint (EPA)
- Lead Paint: Abatement and Mitigation (Virginia DHR)
- Protect Your Family Booklet 2026 (EPA)
- Renovation, Repair and Painting Program: Contractors (EPA)
- Steps to Lead Safe Renovation, Repair and Painting (EPA, 2026)
- Small Entity Compliance Guide to Renovate Right (EPA, 2026)
- TSCA Compliance Guide letter, January 2025
- Chapter 18: Lead-Based Paint and Historic Preservation (HUD)
- Chapter 12: Abatement (HUD)
- Exterior Woodwork Number 2: Paint Removal from Wood Siding (NPS)
- Exterior Paint Project Planning (Historic New England, 2011)
- Preservation Brief 47: Maintaining the Exteriors of Small and Medium Size Historic Buildings (NPS)