
A wood cornice is restored best by repairing it in place: find and stop the water first, probe to learn how much sound original wood remains, splice in matched new wood only where the old has failed, and reproduce missing profiles from documentation rather than guesswork. Replacement of an entire run is the last resort, not the starting point. What follows sets out how architects, contractors and owners of historic buildings can make each of those decisions with confidence.
TL;DR
- Most cornice failure is moisture-related, so trace leaks, failed flashing and open joints before any wood is touched.
- Preservation practice favors retaining the greatest amount of historic fabric; repair and Dutchman splices come before replacement.
- Repair in place whenever possible, with temporary support and work from the top, rather than dismantling the cornice.
- Missing elements are reproduced from historical, pictorial and physical evidence, with new timber matched in species, grain direction and moisture content.
- Painted cornices on older buildings call for lead-safe, low-heat methods and, on tall facades, proper shoring and fall protection.
Table of Contents
- Why cornices fail, and why it matters for the decision
- Assessing the cornice before you choose a treatment
- Repairing in place: the preferred sequence
- Matching profiles and reproducing what is missing
- Safety on an older painted cornice
- Finish: paint, stain and long-term protection
- What affects the cost of cornice restoration
- Our perspective
- From survey to finished cornice with Gepetto Millworks
- FAQ
- Sources
Why cornices fail, and why it matters for the decision
The cornice is the crown of a facade: it throws water clear of the wall, terminates the composition, and, in the Italianate, Greek Revival, Second Empire and Colonial Revival idioms alike, carries much of a building’s character in its brackets, dentils, modillions and coved profiles. It is also the most exposed assembly on the building, sitting at the junction of roof, gutter, wall and sky.
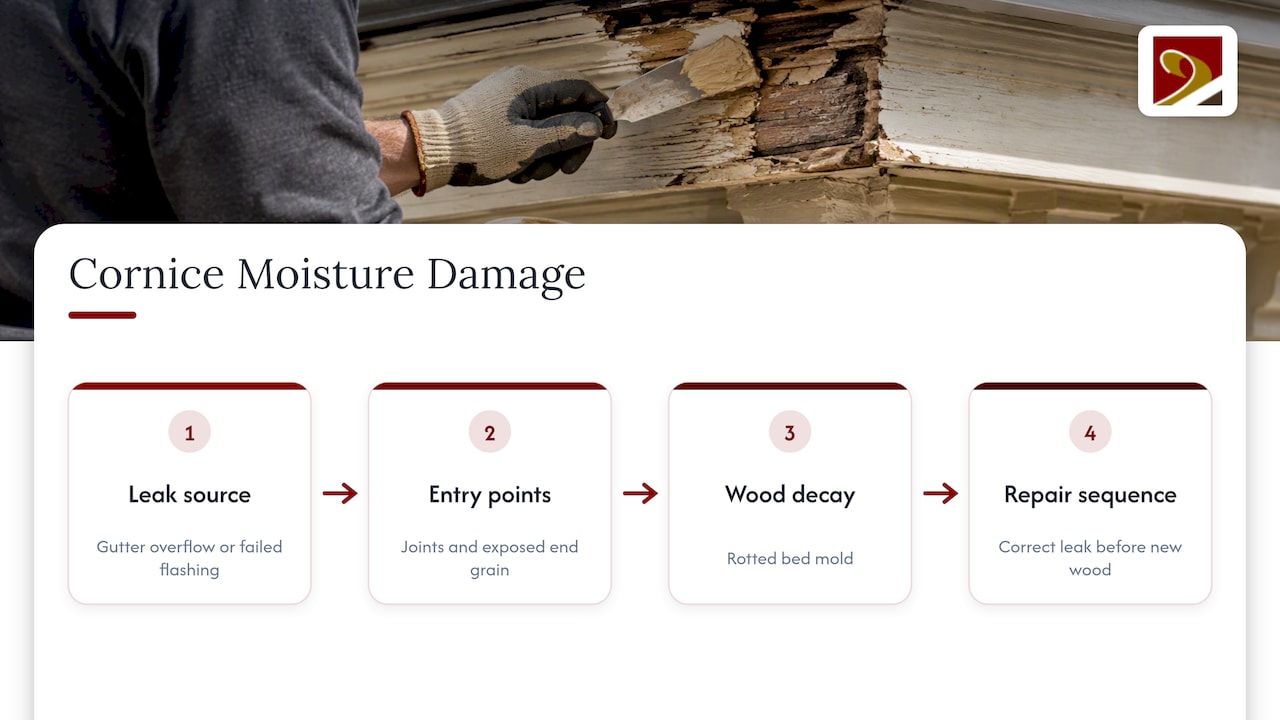
That exposure explains the pattern of decay. A 1987 restoration primer written for building professionals observes that most cornice deterioration is moisture-related, and advises tracing leaks to their sources and gently probing susceptible wood, particularly at joints, exposed end grain and failed flashing. The practical consequence is simple: a rotted bed mold is usually a symptom. If the gutter still overflows behind it, new wood will follow the old into failure.
The second consideration is regulatory and philosophical. The Secretary of the Interior’s Standards for Preservation call for retention of the greatest amount of historic fabric, with work focused on maintenance and repair rather than extensive replacement. Whether or not a project is formally reviewed, that hierarchy is a sound guide, and it shapes everything below.
Assessing the cornice before you choose a treatment
A survey precedes any proposal. The same primer recommends inspecting for missing, damaged, deteriorated and non-original elements, photographing the cornice thoroughly, and gently probing the wood for deterioration. In practice, a useful survey proceeds in this order.
- Record the existing condition. Photograph every elevation, close up and from a distance, and number the bays or sections. Note where profiles have been altered, where later additions such as aluminum wrap or modern gutters have been applied, and where the original geometry can still be read.
- Find the water. Check the roof edge, gutter, downspout outlets, flashing and parapet coping. Deterioration concentrated beneath a particular corner almost always points to a particular leak.
- Probe, do not pry. A blunt awl or screwdriver pressed gently into the surface distinguishes sound wood from punky wood. Pay attention to end grain at miters, to the backs of brackets, and to the soffit at the wall line.
- Map the losses. Sketch each element and mark it as sound, repairable, or lost. This map becomes the basis for the scope of work and, on a certified project, for the documentation a reviewer will expect.
- Check the structure behind it. Where the cornice is tied into a masonry parapet or its framing is compromised, the guidance is to consult a structural engineer for major repairs to strengthen unsafe parapet walls.
When to bring in a professional
A homeowner can reasonably document and photograph. Deciding that material is too deteriorated to save is a different matter. New York City’s Landmarks Preservation Commission guidance says that where materials are too deteriorated to repair and must be replaced for safety, detailed information about the deterioration should come from a qualified engineer, contractor or other industry professional. That is a sensible standard well beyond New York: the written finding is what justifies replacement to a review board, an insurer or a tax-credit reviewer.
Repairing in place: the preferred sequence
The primer’s central practical advice is that most cornices are easier to repair in place. The cornice is temporarily supported, repairs are made from the top where possible, and decorative trim and facing boards are left undisturbed. Removing the face of a cornice to reach a rotted bed is a common shortcut that destroys original paint layers, nail patterns and fit, and it is seldom necessary.
Choosing the repair method by extent of loss
| Condition | Typical treatment | Notes |
|---|---|---|
| Surface checking, small holes, minor soft spots | Consolidant, patching compound or wood putty | Materials must be compatible with the historic wood |
| Localized rot in a molding, rail or bracket | Dutchman (a shaped piece of new wood spliced into a prepared cut) | Match species, grain direction and profile |
| Failed section of a run | Replicate the section in the shop from a template, splice at a joint | Keep adjacent sound original wood |
| Lost or non-original element | Re-create from documentation | Historical, pictorial and physical evidence |
| Structurally unsafe assembly | Engineer-led intervention | Document deterioration before replacing |
The New York guidance describes this ladder directly: small repairs can use wood putty, patching compound or consolidant, while Dutchman repairs can address larger areas of loss, and repair materials must be compatible with the historic wood. Compatibility is the operative word. A filler harder than the surrounding wood will crack the paint film at its edges as the old timber moves seasonally.
Fasteners and anchorage
Old buildings punish careless anchoring. The primer cautions against masonry anchors or bolts shot into masonry with a powder charge, and notes that too many anchors can weaken masonry parapet walls. For interior framing joints, it recommends screws and waterproof glue, and treated lumber to replace deteriorated members where rot is likely to recur; epoxies have a place in shop restoration. Hidden framing is where modern durable materials can be used freely, provided the visible, original-looking surface remains authentic.
Matching profiles and reproducing what is missing
A cornice is read as a sequence of profiles: cyma recta, ogee, cavetto, bead, fillet. A replacement that is a quarter inch off in projection or has a flattened curve will read as wrong even to an untrained eye, because the shadow line changes.
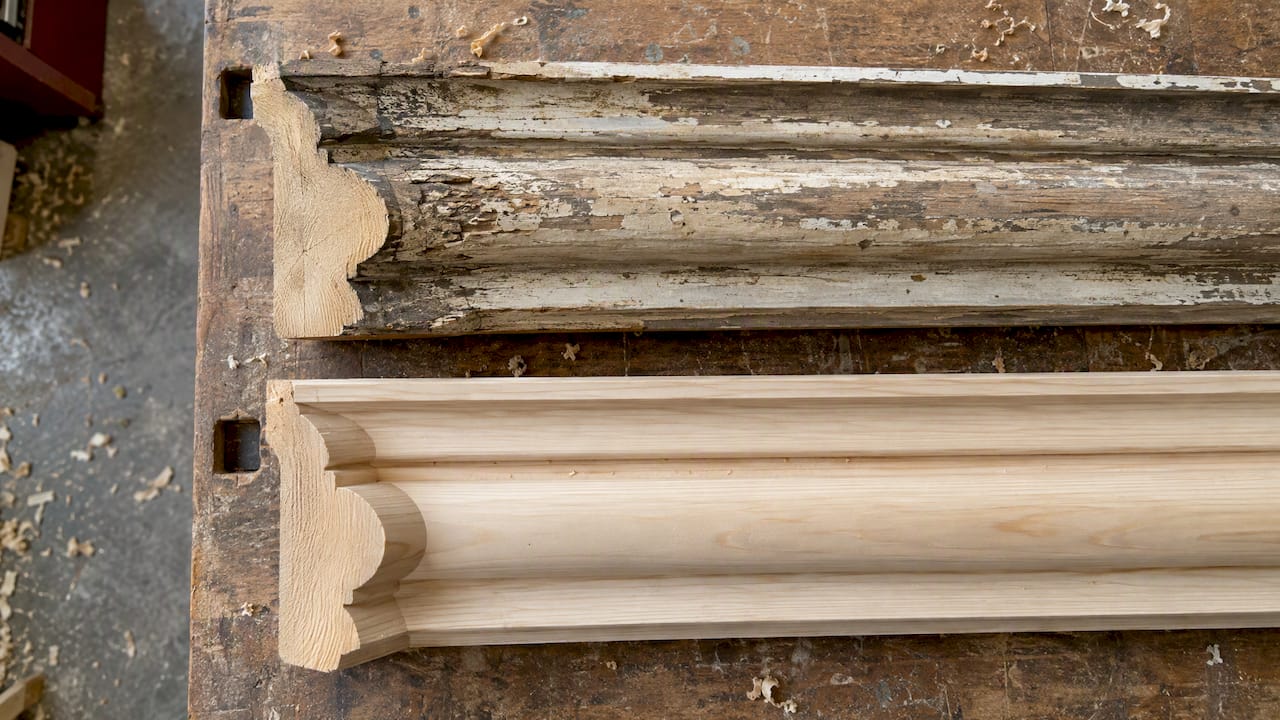
There are two legitimate routes for lost elements. One guideline from a municipal historic district states that a missing wood feature may be accurately restored using historical, pictorial and physical documentation, or else designed to be compatible with the building. Where evidence survives, accurate restoration is the stronger option.
Gathering the evidence
- Physical evidence: ghost lines in the paint, nail holes, surviving fragments on a rear or side elevation, and the profile of the least altered corner.
- Pictorial evidence: historic photographs, insurance maps, postcards and early survey drawings. Local archives and historical societies in the Mid-Atlantic hold more of these than most owners expect.
- Documentary evidence: original specifications, pattern-book designs and builder’s catalogs for the period.
- Sister buildings: neighboring structures by the same builder often share the same bracket and dentil patterns.
A professional conservation article on decorative timber repair states the standard plainly: repair, restoration, replacement or re-creation should match the physical and aesthetic characteristics of the original materials and features. In the shop, that means taking a contour gauge or profile template from the best surviving section, drawing it full size, and milling or turning the new pieces to the drawing. Built-up members such as multi-layer scrolled corbels are typically laminated and carved or shaped to match.
Selecting and preparing replacement wood
The same sources agree on the essentials. Choose a timber type and grain direction as similar as possible to the original, and acclimatize new wood so that its moisture content is close to that of the existing timber, which minimizes expansion or contraction at the junction. A splice made with wet lumber will open as it dries; one made with kiln-dried stock placed in a damp environment will swell against its neighbors.
If provenance matters to your project, verifying FSC certified wood with chain-of-custody codes is a practical way to confirm that replacement stock is what the supplier says it is. For a wider view of how responsible sourcing fits historic work, see our guide to sustainable historic preservation.
Safety on an older painted cornice
Buildings of the cornice-building era are very likely to carry multiple layers of lead-bearing paint, and the work happens at height, overhead and at the roofline. Safety planning belongs to the scope, not to the afterthought.
Lead and paint removal
The National Park Service advises that where lead-based paint is present, damp methods should be used to minimize airborne particles, and that torches, open flames and high heat should be avoided because they endanger workers and can ignite debris in walls. Personal protection, per the same brief, may include goggles, gloves, a mask, closed-toed shoes and a hard hat. Its companion brief on exterior paint problems cautions that unsafe paint removal can damage historic woodwork or injure workers, and recommends choosing the gentlest method that will do the job.
For contractors, the federal rule is OSHA’s construction lead standard, 29 CFR 1926.62, which applies where an employee may be occupationally exposed to lead, including during construction, alteration or repair of structures containing lead. Homeowners hiring out the work should ask any contractor how it will contain debris and protect occupants and neighbors, and should consult the state agency or a certified lead professional for the rules that apply where they live.
Working at height and around unstable parapets
OSHA’s demolition safety guidance is written for demolition, but its principle carries over to restoration: employees must not work where collapse hazards exist until they have been corrected by shoring, bracing or other effective means. If the parapet behind a cornice is loose or the cornice is pulling away, the engineer’s shoring plan comes before the first scaffold plank.
Finish: paint, stain and long-term protection
Repairs only last when the surface is sealed. Prime bare wood and all cut ends, back-prime splices, and keep joints, drip edges and flashings in order so water leaves the cornice rather than entering it. Where a cornice is stained or clear-finished, as on some Arts and Crafts and Craftsman buildings, it is often better to blend new work to sound existing finish; our note on matching stain on old trim without stripping sound finishes explains the approach, and our millwork finishing guide for Maryland homeowners covers coastal and humid-climate conditions.
A related case is the porch, where the same moisture logic governs columns and entablatures. Our guide to porch column repair walks through the decision between repair, splice and replacement, which maps closely onto cornice work.
What affects the cost of cornice restoration
Published per-foot figures for cornice work circulate widely, but they come from forums and lead-generation pages, vary by region and building height, and we would not use them for a budget. The factors that actually move a cost are better established, and every one can be assessed during the survey:
- Access: scaffold or lift requirements on a two-story versus a four-story facade.
- Extent of loss: the proportion that is repairable in place versus rebuilt.
- Profile complexity: a plain crown versus bracketed, dentiled and modillioned assemblies that demand custom knives or hand-carving.
- Hazardous material handling: lead-safe containment and disposal.
- Structural work: parapet stabilization, flashing and gutter reconstruction.
- Documentation and review: drawings, photographs and material submissions for a certified project or local commission.
The best way to control cost is to bid from a written condition survey, so that every bidder prices the same scope. Our own projects are quoted individually, from drawings and site conditions, because no two cornices are the same.
Our perspective
Cornices are where a building’s craftsmanship is most visible and most vulnerable. In our experience the best outcomes begin with restraint: we aim to keep every sound original member, and to treat the new work as a careful completion of the old rather than a replacement for it.
That discipline is also practical. A cornice replicated in the shop from a profile taken off the building, in matched species with acclimatized stock, can be spliced in without disturbing the surrounding original fabric. Our approach to exact historic replication using authentic materials and techniques is designed to support projects seeking historic tax credit eligibility, where reviewers expect a clear record of what was retained, what was repaired and what was re-created.
We also take on complex, architecturally significant work, the unusual bracket, the built-up corbel, the curved or returned run, that general suppliers often decline. Bring us the survey, the photographs, even a single surviving fragment, and we will tell you what can be saved and what must be rebuilt.
Gepetto
From survey to finished cornice with Gepetto Millworks
Gepetto Millworks designs, fabricates and restores custom millwork for historic buildings, including period trim, windows, doors, staircases and other architectural features, with matching for historic tax credit eligibility as part of our approach. If your cornice needs a profile replicated, a bracket re-created or a run of trim milled to match, we can work from your drawings or from the building itself.

See our custom fabrication capabilities, or contact us about your project with photographs and a short description of the conditions. We work with architects, general contractors, builders and owners of historic properties across Virginia, Maryland, the Carolinas and the District of Columbia, and you can browse our Virginia restoration work and historic church woodworking for examples of the scale we handle. Because cornices and windows share a roofline-to-sill logic, owners often pair this work with historic window restoration.
FAQ
Can a rotted wood cornice be saved, or does it always need replacing?
Often it can be saved. Preservation practice prioritizes repair over replacement, and Dutchman splices, consolidants and compatible patching materials address most localized rot. Replacement is justified when a qualified professional documents that the material is too deteriorated to repair, usually for safety.
Should the cornice be removed to repair it?
Usually not. The standard advice is to support the cornice temporarily and repair it in place, working from the top where possible, without removing decorative trim or facing boards. Removal risks damaging original fabric and the masonry behind it.
How do I match a profile that is partly missing?
Take a template from the best surviving section, then confirm it against old photographs, ghost lines in the paint and similar buildings nearby. Accurate restoration from historical, pictorial and physical documentation is preferred; a compatible design is the fallback when evidence is thin.
Is it safe to scrape or sand old cornice paint?
Not without precautions. Older paint may contain lead, so use damp methods, avoid open flame and high heat, and wear appropriate protection. Contractors must follow OSHA’s construction lead standard, and owners should hire a lead-safe professional for the work.
What wood should be used for repairs?
Choose the same species and grain direction as the original where possible, and acclimatize the new timber so its moisture content is close to that of the existing wood before it is spliced in. Treated lumber can be used for hidden framing where rot is likely to recur.
Sources
- Restoration Primer: Wood-Cornice Restoration (1987)
- The Secretary of the Interior’s Standards for the Treatment of Historic Properties: Preservation and Rehabilitation
- NYC Landmarks Preservation Commission Permit Guidebook: Restoration
- Residential Design Guidelines: Wood Structure Exteriors, Siding, Trim and Architectural Elements
- Decorative Timber Repairs, Building Conservation
- Preservation Brief 47: Maintaining the Exteriors of Small and Medium-Size Historic Buildings
- Preservation Brief 10: Exterior Paint Problems on Historic Woodwork
- OSHA 29 CFR 1926.62, Lead
- OSHA Demolition Safety Tips
- Verify FSC Certified Wood with CoC Codes