
Restoring a transom and sidelights begins with a principle rather than a tool: the historic entrance should be retained and repaired whenever possible, and any element that is truly missing should be rebuilt to match documented evidence. The work itself follows a predictable sequence of assessment, careful paint release, repair of frame and sash, reglazing or leaded-glass conservation, safe paint removal and a finish that protects the wood. This guide walks through each stage for architects, contractors and owners of historic buildings.
TL;DR
- Treat the door, transom and sidelights as one composition. The National Park Service advises retaining and repairing the historic entrance and replacing a missing element only to match documented evidence.
- Paint failure is not wood failure. Blistered or peeling paint marks where water is getting in, and the wood beneath is often repairable.
- A transom painted shut should be released by cutting the paint bond with a knife, never by prying or force.
- Leaded and stained glass that is bulging, sagging, or more than 5% broken needs bench conservation, not repair in place.
- Pre-1978 paint may contain lead. Lead-safe repairs fall under the EPA RRP Rule and call for a licensed professional.
Table of Contents
- Why the transom and sidelights are read as one composition
- Assessing condition and original design
- Freeing a transom that is painted shut
- Repairing frames, sash, putty and hardware
- Matching glass and muntins
- Stained and leaded transoms: conserve, do not remake
- Paint removal and lead safety
- When specialist help or replacement is warranted
- Perspective
- Working with Gepetto Millworks on your entrance
- FAQ
- Sources
Why the transom and sidelights are read as one composition
In the Federal, Greek Revival and Georgian Revival houses of the Mid-Atlantic and the South, the entrance was the architectural statement of the façade. A rectangular transom or an elliptical fanlight sat above the door, flanking sidelights echoed its muntin pattern, and pilasters and an entablature framed the whole. Preservation guidance reflects that logic: the Mandeville, Louisiana design guidelines describe an entrance as a collective composition of doors, transoms, sidelights, shutters, pediments and surrounds.
This matters for the work plan. Restoring the transom alone while a vinyl-clad replacement door stands beneath it flattens the proportions the original joiner intended. Planning the whole entrance, even if only one element is funded in the first phase, keeps later decisions consistent: muntin profiles, glass type, paint colors and hardware finishes should be settled once and applied across every component.
Assessing condition and original design
Before a single screw is turned, document what exists. The National Park Service’s Preservation Brief 9 recommends that any evaluation of a historic window note, at a minimum, the location, paint condition, frame and sill, sash, glazing problems, hardware and overall condition of the unit. The same list serves well for transoms and sidelights, with a few additions specific to entrances.
What to record
- Pattern and profile: muntin width and profile, the number of lights, any curved or elliptical members, and the glass type (crown, cylinder, or later plate).
- Operation: hinge mortises, pivot pins, chain or rod hardware and screw holes in the head of the frame often reveal whether a transom was built to open. Paint-filled mortises with no hardware are a strong clue that something once operated there.
- Moisture history: look for staining below the sill of the sidelight and at the base of the stiles, where water collects and end grain draws it in.
- Later alterations: infilled panels, added storm units, or a sign covering the transom glass. Piqua, Ohio’s historic buildings standards, for instance, call it undesirable for transom glass to be covered by a sign.
Reading paint failure correctly
Preservation Brief 9 states that moisture is the primary contributing factor in the decay of wooden windows, and that blistering, cracking, flaking and peeling paint usually identifies points of water penetration. It also cautions that paint failure should not be mistaken for a sign that the wood is irreparable. A probe with an awl or screwdriver, taken at the sill, the bottom rail and the joints, separates cosmetic failure from true rot.
If the wood has been repeatedly repainted, moisture content is worth knowing before any new coating goes on; a short guide on checking wood moisture before priming explains why primer applied over damp wood fails early.
Freeing a transom that is painted shut
Most transoms found in old houses have not failed mechanically. They are simply sealed by several generations of oil and latex paint. This Old House notes that paint buildup is a common culprit for stuck windows in older homes, and that humidity and temperature swings can swell and shrink the wood enough to cause warping and sticking.
The sequence that protects the historic fabric:
- Break the paint bond first. Preservation Brief 9 advises running a utility knife along the seam where the interior stop and parting bead meet the jamb, cutting through the paint film before any movement is attempted.
- Work the joints. This Old House suggests sliding a stiff putty knife, four to six inches wide, between sash and stop and driving it into the joints at the top and bottom to sever dried paint, then applying gentle pressure. The same guide warns against forcing a stuck sash with a pry bar, a 2×4 or brute strength, which splits rails and snaps muntins.
- Use a paint-seal tool where the sash is accessible. Columbia, South Carolina’s historic wood windows guide recommends a window zipper to break paint seals and removing the stop on one side to release the sash.
- Treat every scraped surface as lead-suspect until proven otherwise (see the lead section below).
If the transom was never meant to open, nothing is gained by forcing it. Many historic transoms were fixed lights from the start, and a fixed transom restored faithfully is a correct restoration. Where evidence shows it operated, restoring the hardware and the operation is the more complete outcome, and is one that a millwork shop can reproduce from the surviving pivots, mortises and ghost marks.
Repairing frames, sash, putty and hardware
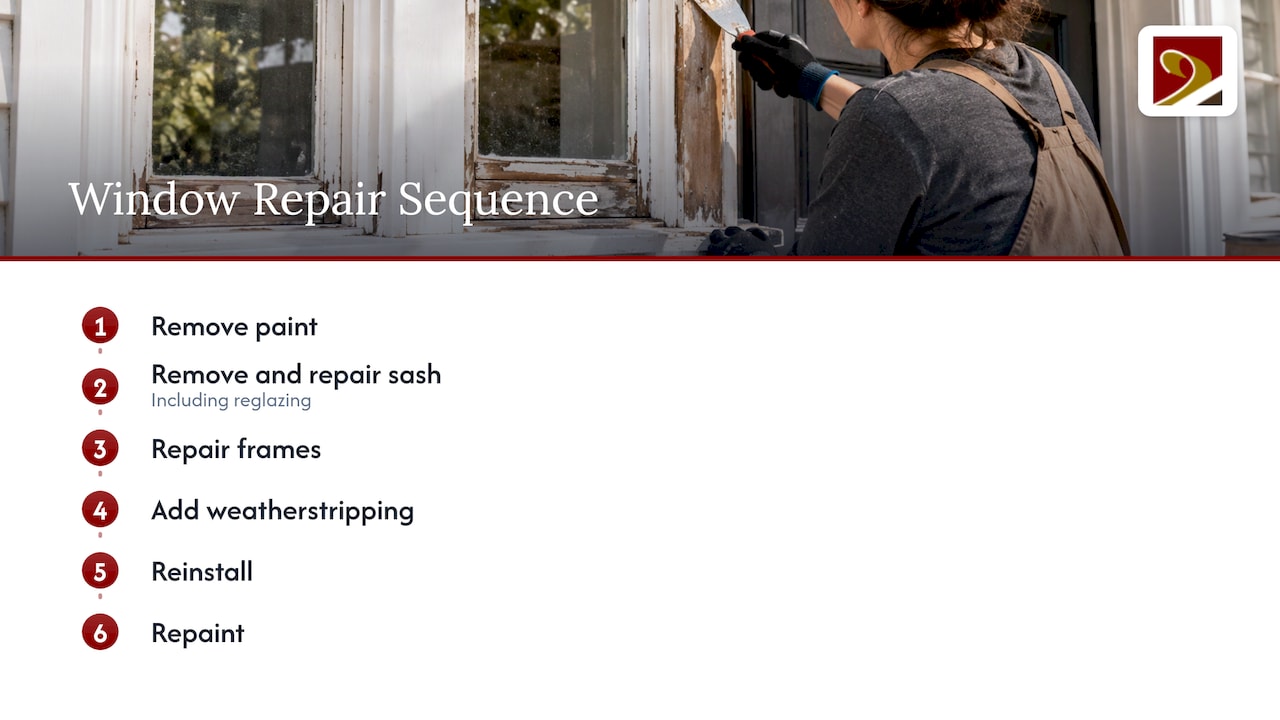
Preservation Brief 9 describes the routine work needed to bring a historic window to like-new condition: some paint removal, sash removal and repair including reglazing, frame repairs, weatherstripping, reinstallation and repainting. Transom sash and sidelight frames follow the same logic, usually with simpler hardware and more delicate muntins.
Wood repair
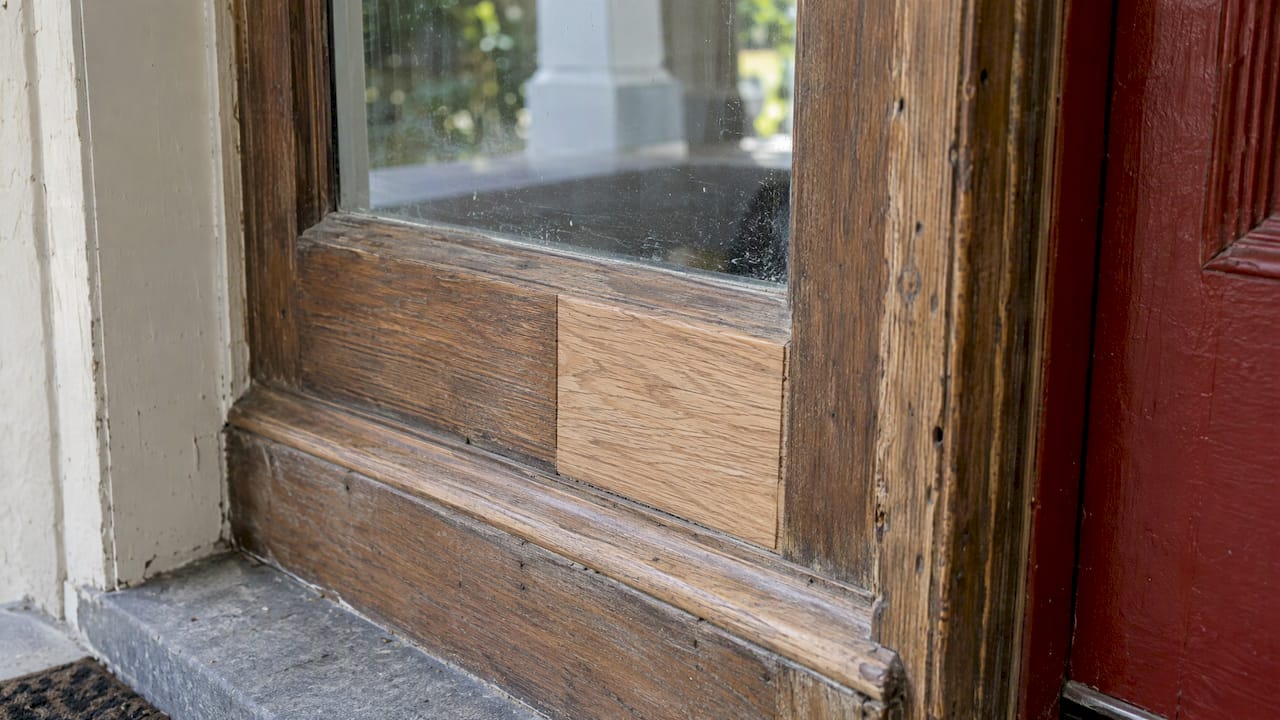
Sound wood stays. Localized decay at a sill, a bottom rail or a muntin joint is cut back to solid material and repaired by a Dutchman (an inset piece of matching species and grain) or by consolidant and filler where the loss is small. Old-growth heart pine, cypress and white oak, common in pre-1900 entrances, have decay resistance that modern framing lumber lacks, so matching species is not a matter of taste but of longevity. Where a muntin or a section of frame is gone, a new member must be milled to the original profile, not approximated with a stock molding.
Glazing putty
The Brief’s guidance on putty is specific. Deteriorated putty should be removed by hand without damaging the wood along the rabbet; hardened putty may be softened with a soldering iron at the point of removal, and putty on the glass can be softened by soaking the panes in linseed oil. Before the glass is set again, a bead of glazing compound or linseed oil putty is laid around the rabbet. This detail is easy to skip and it is the one that keeps water out of the joint for decades.
Hardware and stops
The Preservation Dallas window repair guide states that windows should operate smoothly and easily when work is complete, that damaged or missing stops are replaced in kind, and that historic hardware should be retained and cleaned, with new hardware matching the existing as closely as possible.
Energy performance
Owners often ask whether restoring a transom means accepting drafts. The Pawtucket, Rhode Island Historic District Commission standards state that properly repaired, caulked and weatherstripped historic wood windows with well-fitted storm windows can be as energy efficient as new double-glazed units. A discreet interior or exterior storm panel over a restored transom is the conventional answer.
Matching glass and muntins
Glass is the character of a transom. Kennebunk, Maine’s entrance guidelines are a useful model of how review boards think: in repairing sidelights, the type, style and size of glass and the muntin profile should match the original, and stained or leaded glass should not be introduced in transoms, sidelights or door lights unless evidence documents its original use. In practice this means that a decorative leaded pattern added in 1985 is a candidate for removal in a rehabilitation, whereas a documented original leaded fanlight is a candidate for conservation.
For historic glass, the visible imperfections (waviness, seeds, slight distortion) are part of the building’s age. Where a pane has failed, replacement glass with similar character is selected so that the new light does not read as a flat modern patch among the originals.
Stained and leaded transoms: conserve, do not remake
Many Victorian and early twentieth-century entrances carry leaded or stained glass in the transom and sidelights. The relevant standard is NPS Preservation Brief 33. It states that when waterproofing has failed, the window should be removed and waterproofed on a bench, because leaded glass cannot be adequately waterproofed in place. The same brief says a window cannot be properly repaired in place if it is bulging or sagging far out of plane, if more than 5% of the glass is broken, or if solder joints are failing.
The waterproofing itself is a compound rubbed over the window, preferably while it lies flat on a table, and pressed under the came flange to form a watertight bond between lead and glass. Traditionally it was made of linseed oil, whiting and a coloring agent, per the same Brief.
The ethics are stated plainly there too: the Stained Glass Association of America’s cardinal rule is “DO NO HARM.” Original fabric is re-used, the work is documented for future custodians, methods are reversible unless imminent loss requires otherwise, and the windows remain in their original architectural context. For a project seeking tax credit approval, that documentation is also useful in the application narrative.
A practical sequence for a leaded transom:
- Photograph and rubbing-trace the panel before removal, numbering the pieces.
- Remove the panel along with its frame or stops, supporting it flat during transport.
- Clean, repair cracks and replace only the glass that cannot be saved.
- Re-solder weak joints, waterproof on the bench, and add protective glazing outside if the exposure warrants it.
- Reset in a repaired frame that has been primed and painted before the panel returns.
Paint removal and lead safety
The temptation with a transom frame buried in paint is to strip everything. Preservation Brief 10 advises the opposite: apart from cleaning, light scraping and hand sanding as routine maintenance, paint removal should be avoided unless absolutely essential, and the general approach is to remove paint to the next sound layer with the gentlest means possible, then repaint.
The means matter as much as the extent. Preservation Brief 47 notes that care is needed with historic materials containing lead-based paint, that damp methods can minimize airborne particles, and that heat removal carries safety concerns, including the risk of igniting debris within walls; torches, open flames and high heat should be avoided.
Lead-safe practice
For entrances built before 1978, assume lead until a test says otherwise. The Newport Restoration Foundation advises that although small lead hazards can be addressed by an owner, it is advisable, and in most cases required, to hire a licensed lead professional experienced in historic restoration. Lead-safe repairs fall under the RRP Rule and must be performed by a licensed individual or firm. The same guide explains that lead hazards in historic windows can be mitigated safely, and a lead inspection passed, without replacing the windows.
For owners and contractors, this has a practical consequence: the transom and sidelight frames are often best removed and worked in a controlled shop environment, with containment and HEPA filtration, rather than stripped in place above a front step. Keeping the stripping off site protects the occupants, the neighbors and the plaster around the opening.
When specialist help or replacement is warranted
The preservation hierarchy is consistent across jurisdictions: repair first, replace in kind only when repair is not possible. The Piqua, Ohio standards state that where a transom is missing or too deteriorated to repair, a replacement should match the original as closely as possible. The NPS entrance treatment bulletin adds that a missing element is replaced to match when physical, pictorial or photographic evidence documents its appearance.
Specialist fabrication becomes the right path when:
- the transom or sidelight frame is too decayed to splice, and a new frame must be milled to the original section;
- an elliptical, arched or fanlight sash requires curved muntins that stock suppliers do not make;
- the entrance is part of a certified rehabilitation and the new work must match historic profiles, species and joinery to satisfy review;
- the paint contains lead and the components need controlled shop removal.
Before starting, check which reviews apply. A local historic district commission, a state historic preservation office and, for tax-credit projects, the National Park Service each have their own submission requirements, and their approvals should precede fabrication, not follow it. Local preservation non-profits are, as the Newport guide suggests, a good source of referrals for contractors experienced with historic properties.
Perspective
Most of the transoms and sidelights that come through a historic millwork shop are not beyond saving. They are buried: under paint, under later storm units, under the assumption that the original joinery is gone. In our experience, the first discipline is patience, because an elliptical fanlight or a set of slender sidelight muntins carries the proportions of the entire façade.
We build and restore these components as an extension of the building’s own history. That means studying the surviving profile, matching species and joinery, and making new members only where the old ones are truly lost. It also means producing drawings that architects and review boards can follow, since a rehabilitation seeking historic tax credit eligibility must be able to show that new work replicates the old.
Our view is that the best result is rarely the cheapest-looking shortcut, and rarely a wholesale replacement. It is a repaired original wherever one exists and an exact replication where one does not, delivered by a shop that treats a mullion the way a conservator treats a brushstroke.
Gepetto
Working with Gepetto Millworks on your entrance
Gepetto Millworks designs, fabricates and restores wood windows, doors, trim and architectural millwork for historic buildings, including replication of period features and matching for historic tax credit eligibility. For a transom and sidelights project, that can mean repairing the original sash, milling a new frame to the surviving profile or reproducing a missing fanlight from documentary evidence. Our historic window restoration service is the starting point for sash and frame work, and our custom fabrication offerings cover solid wood entry doors, historic-pattern doors and the casework around them.

We work with architects, general contractors, builders and owners across Virginia, West Virginia, North Carolina, South Carolina, Maryland and the District of Columbia. Send drawings, photographs or measurements of your entrance through our site and we will discuss scope and approach.
FAQ
Can a painted-shut transom be made to open again?
Usually, yes, if it was built to open. Cut the paint bond along the stops with a utility knife, work a wide putty knife into the joints and apply gentle pressure, never a pry bar. If the hinge or pivot hardware is missing or the frame has decayed, a millwork shop can restore operation with matching hardware and repaired members.
Should I replace cracked glass in a transom with modern glass?
Only when the pane cannot be saved. Guidance such as Kennebunk’s entrance standards calls for replacement glass that matches the original in type, style and size, with the original muntin profile retained. For leaded or stained glass, conservation by an experienced glass specialist is preferred over re-creating the panel.
Is it safe to scrape and sand old transom paint myself?
Not without testing for lead first. Entrances predating 1978 may carry lead-based paint, and lead-safe repairs fall under the EPA RRP Rule, which requires a licensed individual or firm. Damp methods and HEPA vacuums reduce airborne dust, and open flames and high heat should be avoided.
When does a leaded glass transom need to come out of the opening?
When its waterproofing has failed, because leaded glass cannot be adequately waterproofed in place. NPS Preservation Brief 33 also says a panel cannot be properly repaired in place if it is bulging or sagging, if over 5% of the glass is broken, or if solder joints are failing.
Can a missing transom or sidelight be rebuilt?
Yes. The Secretary of the Interior’s Standards for Rehabilitation support replacing a missing element to match when physical, pictorial or photographic evidence documents it. Old photographs, neighboring houses of the same period and ghost lines in the masonry or trim are the usual evidence.
Sources
- ITS Number 26: Entrance Treatments, National Park Service
- Preservation Brief 9: The Repair of Historic Wooden Windows, National Park Service
- Preservation Brief 10: Exterior Paint Problems on Historic Woodwork, National Park Service
- Preservation Brief 33: The Preservation and Repair of Historic Stained and Leaded Glass, National Park Service
- Preservation Brief 47, National Park Service
- Entrance Surrounds and Doors, Kennebunk, Maine
- Historic Wood Windows and Doors, Columbia, South Carolina
- How To Open Jammed Windows, This Old House
- Guide to Window Repair and Replacement, Preservation Dallas
- Historic District Commission Standards and Guidelines, Pawtucket, Rhode Island
- Preserving Historic Windows While Remediating Lead Hazards, Newport Restoration Foundation
- Historic Buildings Design Standards, Piqua, Ohio
- Mandeville Design Guidelines, Mandeville, Louisiana
- Checking wood moisture before priming